
The Patch Tool in Photoshop can completely transform your images by removing unwanted or distracting spots or objects from them. Therefore, making it one of the most helpful tools for photo editing. Even with several years of experience, you could still accidentally include something unflattering or distracting in a photograph. And once you have taken the image, the chances of recreating it are relatively low. In such cases, the Patch Tool, which belongs to the family of Healing Brush Tools, can become a life-saver. Moreover, just like a magic trick (which needs some practice, of course), this feature can also help you add or copy objects to further enhance your image. It may be a little confusing at first, but in this blog, we offer you some ways to successfully use this tool for your future edits.
How to Use the Patch Tool in Photoshop
You can find the Patch Tool on the left-hand side menu in Photoshop. If you don’t find it there, look for it in the drop-down menu of the Healing Brush Tool. The Patch Tool icon looks like a patch sewn onto a piece of clothing. If you want to use the shortcut key to access the Patch Tool in Photoshop then press J on Mac or PC.
1. To Delete an Object
Open the wedding photo you want to edit in Photoshop. Then create a Duplicate Layer so that you can work on it without making any changes to the original image. This way you will have the chance to go back to the original and work on it again if you want to. We recommend creating a Duplicate Layer for editing because Photoshop allows for Destructive Editing, as opposed to the Non-Destructive editing in Lightroom. So go to the Layers Panel on the right side of your workspace. Now, right-click on the Background image layer and select Duplicate Layer. You can also select it under the Layer option in the top menu bar.

Don’t make changes to any of the setting options when the dialogue box appears. Just click OK and you will see a copy of the layer (Duplicate Layer) appear above the Background Layer. Next, select Source and Normal modes from the top of your Photoshop window. Choose the Patch Tool from the toolbar on the left, or simply press J on your keyboard.
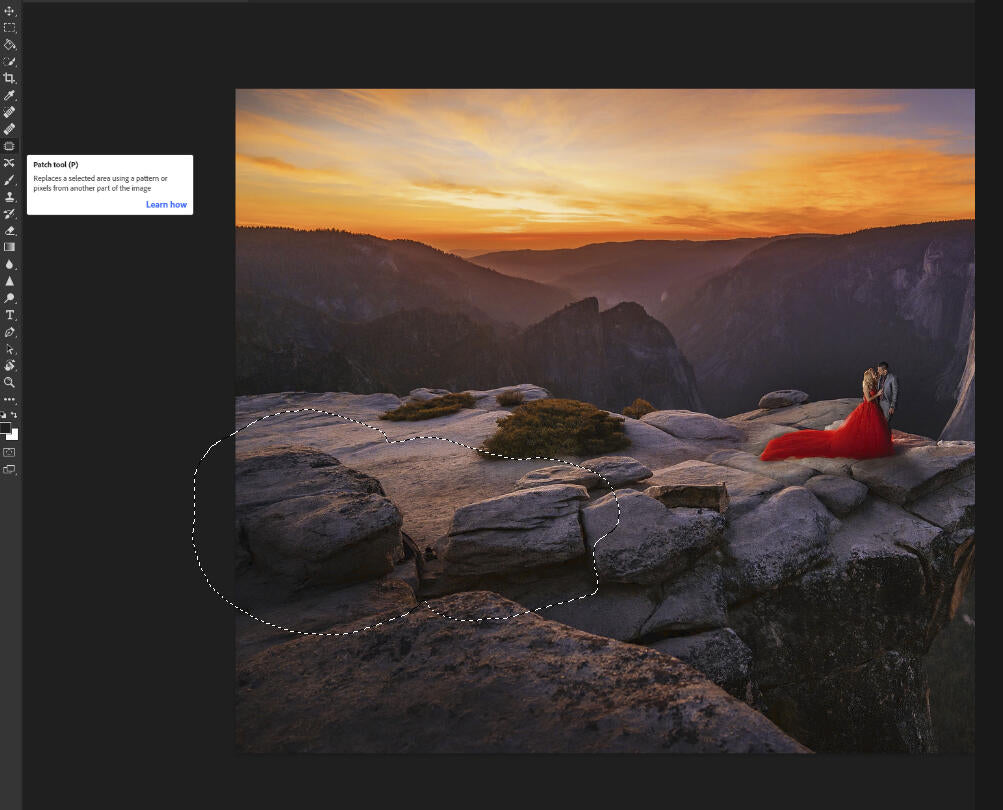
The actual work will start here as you can now make a selection around the object you want to remove. You can use any selection tool to do this. Once you have drawn around your object, you will see a black and white dotted shape around the selection. Go back to the Patch Tool when you finish making the selection. Now, click on the dotted shape or the selection and drag it to a different area using your mouse. The object you targeted will disappear. This happens as Photoshop blends the pixels of the source area (space where you dragged the selection to) with the destination area (the area around the object). If you don’t feel satisfied with the edit then repeat the process by selecting areas around your main object until the pixels blend well in that area.
Suggested Read: How To Merge Layers In Photoshop
2. To Add or Copy an Object
To replicate or copy an object with the Patch Tool in Photoshop, go to the Layers Panel and right-click on the Background image layer. Then, create a Duplicate Layer. Click OK when the dialogue box appears. Select this new layer for work. Now, select the Patch Tool either from the toolbar on the left or by pressing J on your keyboard. Next, make a selection around the object you want to copy. If you want this selection to be copied to another spot or destination, select Destination at the top of your window. Your next step would be to click on the selected area and drag it to your destination area on the wedding image. This is how your object will be copied.

The Content-Aware option in the Patch Tool can also help you get the same result. Ensure you work on a Duplicate Layer again. Then, select Content-Aware from the Patch Tool toolbar at the top of your workspace. Now, draw a selection to a spot or destination on your image where you want to copy the object. Click on this empty selection area and drag it over the object you want to copy. Now, go to the Structure and Color options in the Patch Tool toolbar and move the sliders to adjust the blending effects.
Exact copies of objects can look unnatural. So if you don’t want the exact copy of your object, you can adjust its shape using the Transform Tool. Under the Edit option in the top menu, select Free Transform and make adjustments to the shape by expanding or decreasing its size. You can also rotate the object. Shortcut keys to access the Free Transform Tool are Cmd + T on Mac and Alt + T on PC.
Suggested Read: How To Dodge And Burn Your Images In Photoshop
How to Use the Content-Aware Move Tool

If you want to move or shift the place of the targeted object in your wedding image, you can use the Content-Aware Move Tool. This tool allows you to move an object from its original spot to the destination spot. When you use the Content-Aware Move Tool, Photoshop doesn’t just leave the original spot blank but replaces it with the information present in the rest of your image. But you can still decide the amount of blending you want with the surrounding area when moving objects. You can input your values in the Color and Structure options to get the kind of result you want.
The Patch Tool in Photoshop can be a very useful feature as you edit your final photographs, but like many other tools, you may need some practice before you get used to it. The more you experiment with different kinds of images, the more you will get used to using this feature.
At ShootDotEdit, we believe that the post-production work is just as important as taking those stunning photographs of your couples. But as a wedding photographer, we understand that things might get hectic sometimes and that’s where we step in. We can help lessen your post-production workload by doing the editing for you. To learn more about how we can help your wedding photography business, take a look at our price plans.
Leave a comment