
HOW TO GET RID OF GLASSES GLARE IN LIGHTROOM
As a photography post production company, we provide fast and personalized editing for professional wedding photographers. We understand that every shoot brings different scenarios and conditions that may affect your wedding images. And even if you are outsourcing photo editing (to save time and streamline your workflow), it can be valuable to understand how certain aspects of the editing process work, such as the best ways to use retouching tools to adjust skin tones or how to remove glasses glare. Below, we cover how to get rid of glasses glare in Lightroom, touching on the 2 most effective methods.
1. USE THE SPOT REMOVAL TOOL

For some wedding photographers, Photoshop has been seen as the be-all and end-all for operations from fixing hair to handling glare. For those who want to learn more about how to get rid of glasses glare in Lightroom, it can be valuable to become familiar with the Spot Removal Tool in Lightroom.
This feature enables you to remove unwanted aspects of a photo in a few simple steps but takes a considerable investment of time to get it right. Adobe’s general tutorial uses removing a human subject from an example and details how to select a sample area to borrow from to conceal the unwanted part of the photograph.
This feature enables you to remove unwanted aspects of a photo in a few simple steps but takes a considerable investment of time to get right. Adobe’s general tutorial uses removing a human subject from an example, and details how to select a sample area to borrow from to conceal the unwanted part of the photograph.
GLASSES GLARE
When trying to do away with glasses glare, the process functions similarly but is much more delicate. This is because while removing glasses glare you are, generally speaking, working within a smaller area and have much less room for error.
Because of this, you will want to use a small brush, proceed slowly, and stop often to double check your work. It is likely going to get tedious, so put on some relaxing music, fix a drink, and get ready for the long haul as well.
Related: What else can you use the Spot Removal tool for in Lightroom? Find out in our post, where we share our top picks for edits to make that can transform your images!
2. LEARN HOW TO CLONE
First, you will need to set your pins (the area you want to conceal and the area you want to clone from). You will be setting and resetting these often, as Lightroom does not always choose the best places to draw from in a photograph by default. It might be helpful to keep some of the shortcuts you can use in Lightroom for this procedure at the forefront of your mind.
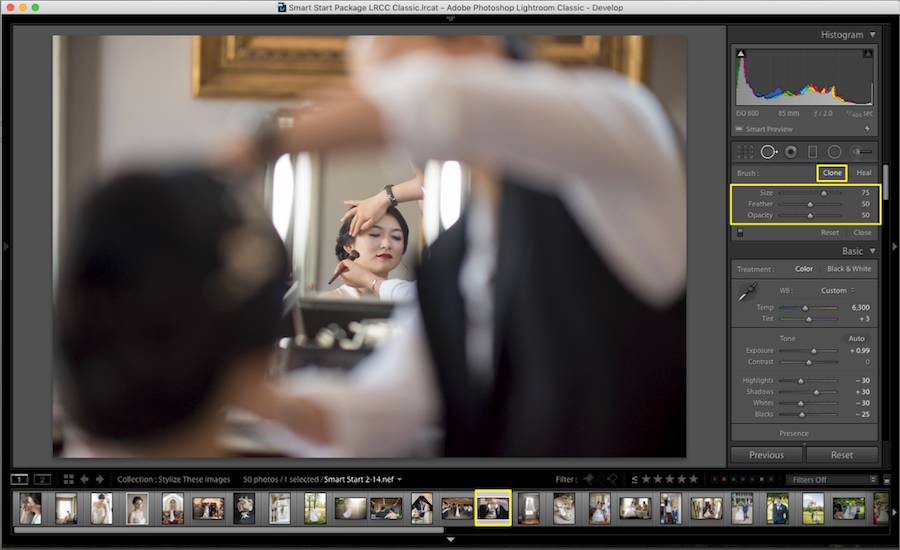
You can click to create a pin and, if using the control/command click, drag your mouse to find your clone source with which to conceal the glasses glare. Using control/command plus the alt/option key allows you to adjust the size of the pin, and you can use the delete button to remove a pin.
Again, work slowly to avoid making any errors. Eyelashes, in particular, can be difficult to nail with the Spot Removal tool, and you will also need to pay special attention to angles, especially around areas like the glasses frames. Frames are often slanted, so selecting an appropriate section of your image to borrow from to correct a glared area is going to be doubly crucial when editing portraits.
As a final note on correcting glare with the Spot Removal tool, remember to zoom out to check your progress. You will need to work up close to grab and replace details, but viewing the image at normal size will reveal if your handiwork is truly up to snuff, as you will be able to see the entirety of your photograph in context, and check to see if any corrections you have made appear to be out of place.
3. APPLY ALTERNATE TECHNIQUES
As an alternate technique, you can apply the Adjustment Brush Tool or the Graduated Filters. The Adjustment Brush Tool and Graduated Filters are often used to make skies darker or add lens blur effects in photographs. If you’re trying to get a handle on how to get rid of glasses glare in Lightroom, though, they can serve as an alternative solution.

Pulling from the Adobe help guide for a moment, these tools allow you to “apply Exposure, Clarity, Brightness, and other adjustments to photos.” In the case of the adjustment brush, you would paint these into your photo. With the graduated filter, you can apply them gradually across a range of the photograph. In cases where you want to eliminate glasses glare, the dehaze effect with the adjustment brush makes for a fine option, as long as the highlights in your photo are not too severe.
You will want to start with a mask overlay so that you can keep yourself restrained to the glasses. Using the adjustment brush, you will start with an initial mask selection which can be further refined using the color range mask selector or luminance range slider. Once you have the mask restricted to your subject’s glasses, you can start making your alterations.

Start with a weaker brush and low feathering, increasing it as needed while you work. Like with the Spot Removal tool, you will want to work slowly and check your progress. You will also want to stay aware that the dehaze feature can cause a loss of detail, and is best used sparingly. There is also much more depth to the adjustment brush and graduated filters, so for complete mastery, you would be well served by reading more of the Adobe help guide above.
Further Read: Lightroom Shortcuts Library: Keyboard Keys For Windows And Mac
With professional photo editing, you'll be able to stand out in the competitive wedding photography industry and ensure client satisfaction and the success of your business. Learning how to get rid of glasses glare in Lightroom is a hefty undertaking. Correcting glare on camera is generally preferred, and in instances where it is not a possibility, enlisting a photo editor for photographers can save you the hassle of trying to clone or dehaze. Your time can be better spent on other parts of your photography business, rather than sitting behind your computer editing your wedding images.
At ShootDotEdit, it’s just the beginning of the value that we can offer you as a professional post-processing company specializing in wedding photography. Our workflow is Lightroom-based and with the help of Lightroom Guru, Jared Platt, our team is trained on the best ways to use the software to create consistent edits.
From straightening out your best photos to helping you define and showcase your unique photography style, we can simplify your workflow and save you time and energy, enabling you to concentrate on the more significant aspects of your photography business. Check our pricing plans to see how we can help your wedding photography business.
Leave a comment