
The Content-Aware Fill in Photoshop is an amazing tool that can help you repair, improve, or edit your wedding images and turn them into masterpieces. This tool may seem similar to the Spot Healing Tool or the Patch Tool in Photoshop, but in reality, it is very different. While the Spot Healing Tool helps you remove small distractions or spots from your images, the Content-Aware Fill Tool is useful for removing bigger objects from your images. The Patch Tool allows you to select and replace pixels from one part of the image to the other, while the Content-Aware Fill in Photoshop gives you more control and flexibility when replacing the pixels. It uses Artificial Intelligence (AI) and is more sensitive and subtle than the Patch tool. It can also be used to move objects within an image or to another image. As you can clearly see, the Content-Aware Fill in Photoshop can impress you in many ways. To learn more about what it can do, read further!
Where is the Content-Aware Fill Tool in Photoshop

Before you go to the Content-Aware Fill tool, you will have to select the Patch tool first. The Patch tool in Photoshop looks like a patch sewn onto a piece of cloth. You will find that and the Content-Aware Move tool in the toolbar. The Content-Aware Move tool looks like a pair of crossed arrows. If you don’t find these tools here, go to the Windows drop-down menu. Select Edit and then go to the Toolbar option. Once you find the tools you are looking for, drag them from the right side column to the left one. Now, start by selecting the Patch tool. Next, click on the Content-Aware Fill in the Options bar. To open it, make a selection around an object in your image. Again, go to Content-Aware Fill. If you see the Content-Aware Fill option grayed out, use the Lasso tool to highlight your selection. This will activate the Content-Aware Fill command.
Related Read: How To Use The Patch Tool In Photoshop
How to Use Content-Aware Fill
1. To Remove Objects From Images

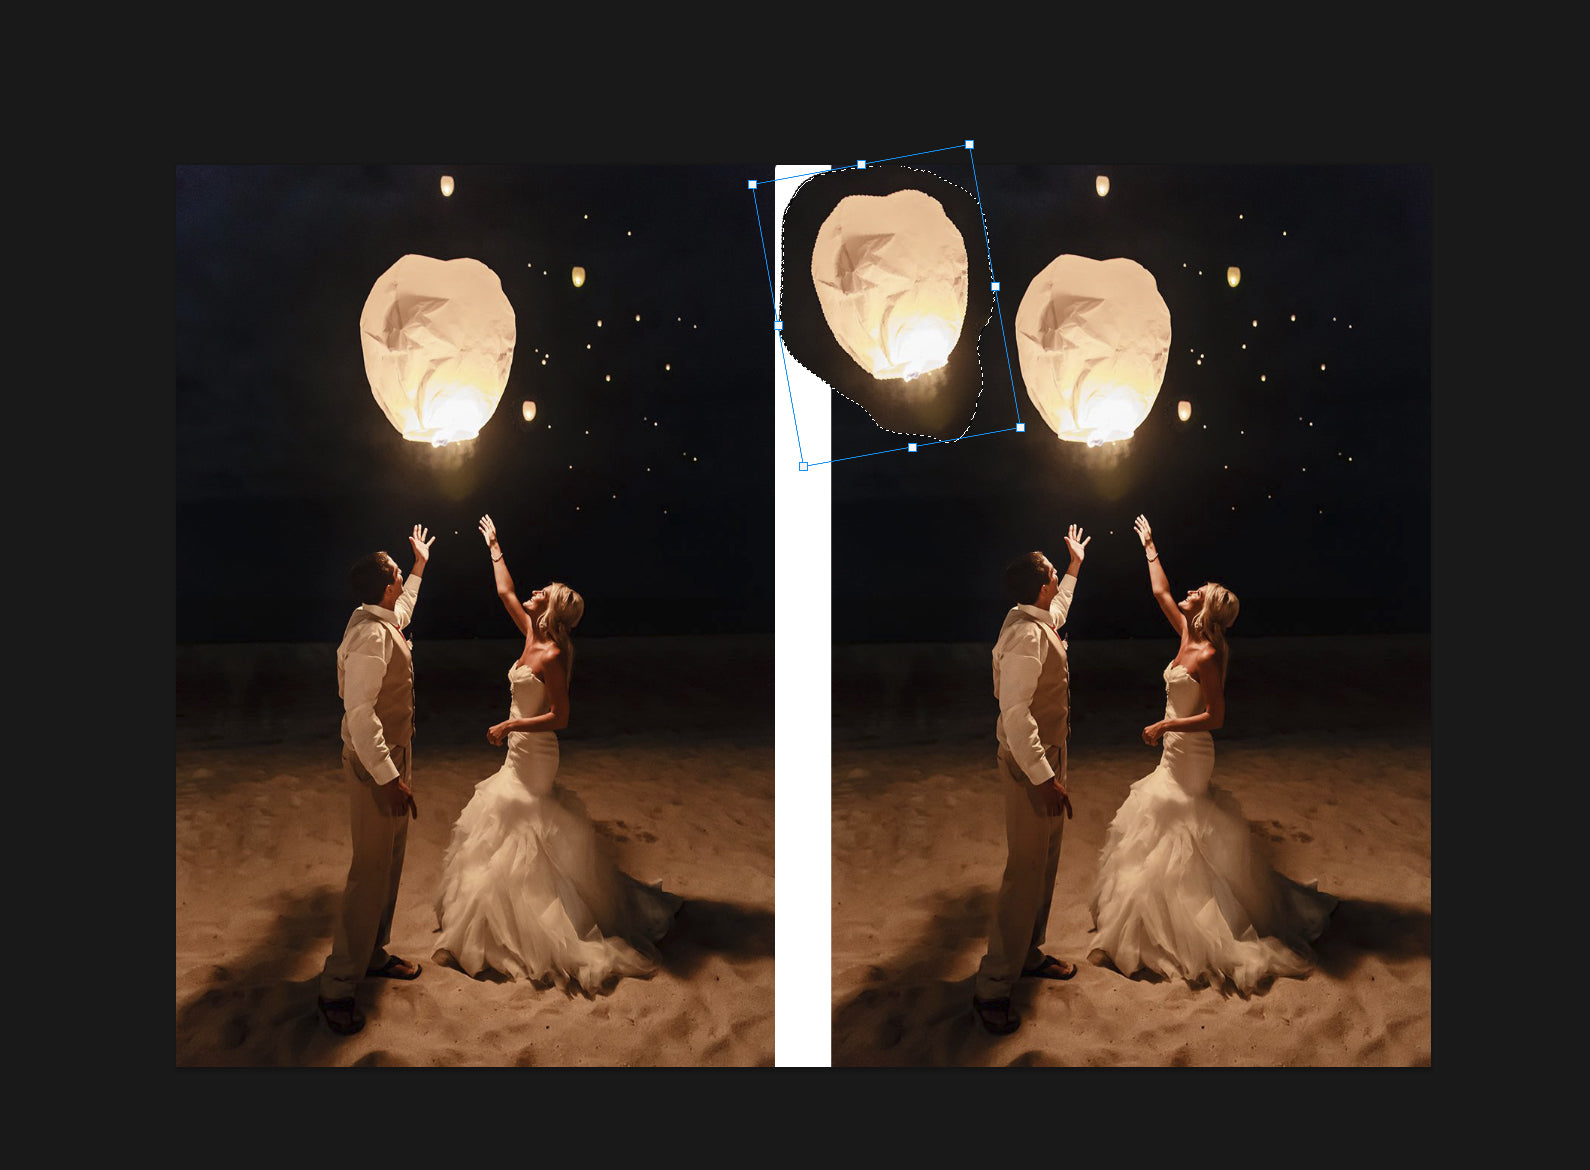
Start by creating a Duplicate Layer in Photoshop before you begin using the Content-Aware Fill. This will ensure that you don’t lose your original image even as you make edits to the duplicate layer. To do so, go to Layers and then Duplicate Layer or press Ctrl + J on Windows or Command + J on Mac. Now, choose the Patch tool and draw a selection with the Lasso tool around the object you want to get rid of. Before moving forward, make sure you have selected Content-Aware in the Options bar.
Now, pick the area you had selected and drag it to your sampling area. Once you release the selection, Photoshop will take it as a suggestion and use Content-Aware Fill to create new pixels in that area. If you don’t like the results and want to undo the changes, select Edit and then go to Undo Patch Selection. You can also do this by pressing Ctrl + Z on Windows or Command + Z on Mac. Next, drag the patch to another place.
To get the desired results, you can use the other two Fill Settings options in the Patch option bar. The settings are — Color and Structure. With Color, you will be able to tell Photoshop how much color blending you want. 0 being the lowest and 10 the highest. With Structure, you will inform Photoshop how closely you want it to adhere to shapes in the fresh content. 0 will mean loosely adhere to shapes, and 7 would mean high adherence.
NOTE: If you want to redo a step, press Shift+Ctrl+Z on Windows and Shift+Command+Z on Mac.
2. To Move Objects
In the above option, we mentioned that you can use the Content-Aware Fill in Photoshop not only to remove unwanted objects from images but also to move them. How do you do that? Again, begin by creating a Duplicate Layer. Then, select the new layer and click on the Content-Aware Move tool in the Toolbar. Next, draw a Lasso selection around the object you want to be moved. Just like in the previous step, pick the selected area and drag it to the area you want to move it to. When you are done, you will see a transform box around your selection. This will help you to rotate the content and make it fit better in the new space. At this point, you can either click Return or accept changes by check-marking in the Options bar. If you accept the changes, Photoshop will move selected pixels into the new location and patch the original area using AI. You can fine-tune your edits by using the Content-Aware Fill settings options Color and Structure again.
3. To Fix Image Composition

Content-Aware Fill can also be used to fill a blank or empty background. For example, you remove an object from your image. But now, you feel that your main subject would look better if it were placed on the right or the left side of your image rather than at the center. To fix this, you need to first unlock your layer. You will be able to do so by clicking on the lock icon. Once your layer is unlocked, move the subject to wherever you want.
Use the Move tool from the left-hand column or press Ctrl + V on Windows or Command + V on Mac. Moving the image will now result in an empty patch in the space where the image was initially placed. This is where the Content-Aware Fill in Photoshop can rescue your photograph. Choose the Marquee tool and select the empty area that you see in your image. Make sure to select some extra area from the image. Go to the toolbar at the top and select Edit. From the drop-down menu, choose Fill. When you see the Fill dialog box, select Content-Aware from the pull-down menu and then click Ok. Photoshop will immediately fill the blank space using the information in the rest of the image. You will not be able to control this replication process because it is automated, but Photoshop does a great job filling the space and completing your image on its own. A first-time viewer might not even be able to point out any editing. If you still want to clean-up your image a little, you can use the Clone Stamp tool.
Suggested Read: 5 Wedding Photography Composition Tips
Content-Aware Fill Settings Options
There are a few settings that can help you get better results with the Content-Aware Fill in Photoshop. You will find them in the Content-Aware Fill Panel.
1. Sampling Area Overlay Settings
- Show Sampling Area: This option will allow you to see the sampling area or the excluded portion as an overlay on your image. You will see this in the document window.
- Opacity: The Opacity option will let you set the opacity of the overlay in the document window. To set the opacity percentage, you can move the slider to the left or right. Photoshop will also give you the option of typing a value in the percentage text box.
- Color: This setting will let you assign a color to the overlay in the document window. Once you click the color selection box, you can pick a color from the Color Picker.
- Indicates: The Indicates option will show you the overlay in the sampling area or the excluded portion. You can select your preferred option of either the Sampling Area or the Excluded Area from the drop-down menu.
2. Sampling Area Settings

- Auto: If you want to use content similar to the surrounding area, then select Auto.
- Rectangular: To use a rectangular portion around the fill area, you can choose this option.
- Custom: Select Custom if you want to determine a sampling area manually. You can use the Sampling Brush tool if you want to add something to the sampling area.
- Sample All Layers: Selecting this setting will mean choosing to sample pixels from all the layers visible in your document.
3. Fill Options
- Rotation Adaptation: This setting will help you fill content with rotated or curved patterns. You can choose an appropriate option for your image from the drop-down menu. The sub-options you will see are – Full, High, Medium, Low, and None.
- Color Adaptation: You can select this option if you want a better match regarding the contrast and brightness. This setting will also be useful for content with texture and gradual color changes. The sub-options you will see here are – Very High, High, Default, and None.
- Scale: This option will allow content resizing for a better result. It will be useful if you want to fill content that has repeating patterns of varied sizes.
- Mirror: Select Mirror if you want the content to be flipped horizontally. This will help you with images that have horizontal symmetry.
- Output to: This is an Output setting that will help you determine if you want to apply Content-Aware Fill to your Current Layer, a New Layer, or your Duplicate Layer.
NOTE: If you want to reset to default Fill settings, click the reset icon in the Fill Settings menu.
How to Apply Multiple Changes

The Content-Aware Fill Tool in Photoshop allows you to fill multiple areas of your image in one go without leaving the workspace. Once you get the desired result for a selection that you made in your image, click Apply in the Content-Aware Fill panel. This will mean you will commit or confirm fill. The workspace will still remain open. Next, you can use the Lasso tool to make a new selection to fill.
How to Save or Cancel Fill Edits
Once you are done and satisfied with the edits, you can commit fill before closing the Content-Aware Fill workspace. Go to the bottom of the Content-Aware Fill panel and click Ok. You can also press Enter in Windows or the Return key in Mac. If you want to cancel fill instead of committing, go to the bottom of the Content-Aware Fill panel and click Cancel. Alternatively, you can also use the Esc key.
Further Read: How To Add Bokeh Effect In Photoshop
We try to simplify these technical tips as much as we can. We hope these tips on the Content Aware Fill in Photoshop will help you better understand the feature and create stunning images for your portfolio and your customers. It can prove to be a magic tool for removing and moving objects or even filling empty spaces in your images. With some practice and a little patience, you can make it a part of your post-production workflow and impress your clients with amazing results.
At ShootDotEdit, we understand the needs of wedding photographers and love sharing tips and tricks to help you grow as artists and business owners. We also help you speed up your post-production workflow by offering professional photo editing services. To learn more about how we do it, check out our pricing plans.
Leave a comment