
Cropping and straightening photos is a crucial and fundamental step in image processing. For a wedding photographer, it’s one of the most helpful features in Lightroom. With Lightroom’s crop and straighten tools, you can improve the composition of your photos and also align them with your signature style. The best part about using these tools is that Lightroom’s non-destructive editing feature keeps your original images safe! Whether you are a beginner or would like a quick recap of how to crop and straighten in Lightroom, this blog could be your guide.
Advantages of Cropping and Straightening in Lightroom

Before learning how to crop and straighten in Lightroom, you should know why you need to do it at all. The Crop and Straighten tool in Lightroom helps you in so many ways, and here are a few of the advantages.
- One of the biggest reasons to crop a photo is to make it look better. Cropping can strengthen composition if used carefully.
- Another significant benefit of cropping is its ability to eliminate distractions in an image.
- With a little help from the Cropping tool, you can remove any dull parts of a photo.
- Cropping lets you keep your distance from the bride and groom. This becomes even more necessary in the times of COVID. You can then crop the unwanted parts from the image you took from a distance.
- These tools help you in case you had to capture an action scene when you weren’t expecting it.
- You can save an amazing image by straightening it. This will help bring symmetry to your composition.
What Does the Crop and Straighten Tool Do

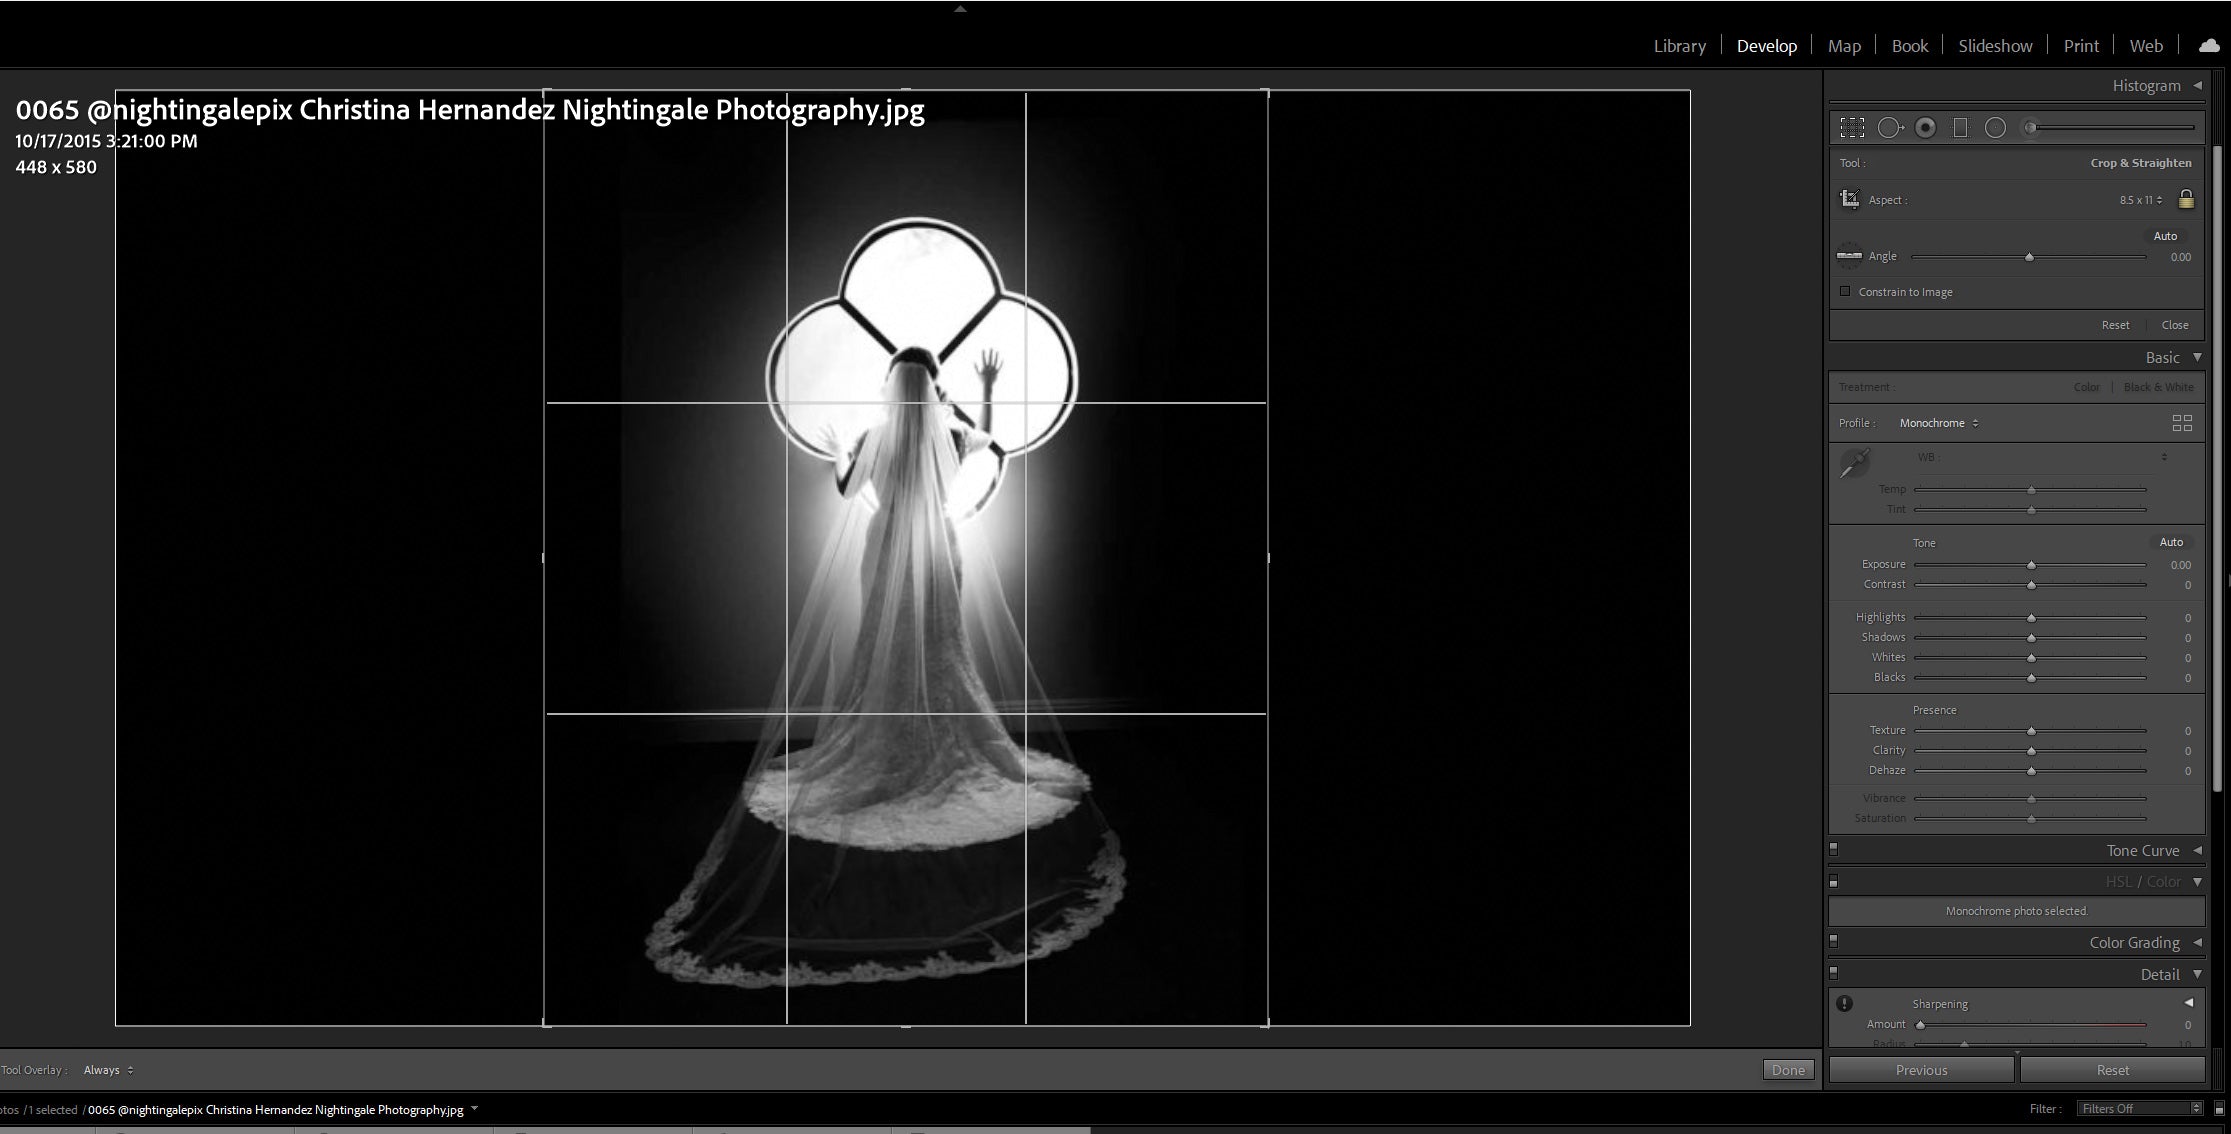
You can use the photo cropping tool in Lightroom by clicking the grid icon in the Develop Module, under the histogram, and above the Basic panel. If you want to make it quick, you can press R on your keyboard to open it. Once you click this tool, you will see 4 options. They are Aspect, Angle, Constrain, and Tool overlay.
- Aspect is used to change the aspect ratio of your photo. You will find the default setting to be Original, but you can change it to different sizes if you want. It can range from 1×1 to 16×10. You can also choose Custom if you want to create your own dimensions.
- Angle lets you straighten your photo by adjusting the way it slants. Moving the Angle slider to the left or right will help you tilt the image up to 45 degrees in either direction.
- Constrain to Image might not be necessary for most situations but can be essential when you adjust your lens distortion, which leads to white areas in the photo. Activating Constrain will allow Lightroom to leave out those spaces when you crop your image.
- Tool Overlay is a guide that helps you make the exact adjustments you want. It helps you ensure your image is straight and your composition is perfect. Users can choose from a variety of overlays to help guide their cropping. Overlays available in Lightroom include Grid, Thirds, Diagonal, Center, Triangle, Golden Ratio, and Golden Spiral. While the Crop tool is in use, the user can press the O letter shortcut key to cycle through the list of available overlays.
Suggested Read: 12 Easy Steps To Editing Portraits In Lightroom
How to Import a Photo for Cropping or Straightening

The first step to cropping your wedding photo is to import it into Lightroom. Click Library on your Menu bar and then select Import at the bottom left of your screen. When a dialogue box appears, click on Select a Source at the top left of the screen. Next, look for the folder that contains your photo. Choose the photo you want and click Import. If you want to transfer the images faster, you can drag a photo directly from an open folder into the library.
Now, check the thumbnail of the image you selected. When you move your mouse over the image, you will see an arrow at the bottom left of the box and another one on the right. To change your image’s orientation in Lightroom, click on any one of these arrows. If you want to add the photo to your quick collection, click the small circle inside the thumbnail. This option can be helpful if you are doing bunch-editing and need quick access to your images. After completing these steps, go to the Develop module to start editing your photo.
How to Crop and Straighten Photos in Lightroom
1. Change the Aspect Ratio
The aspect ratio of your image refers to its dimensions. You can change the size of your wedding image depending on where you plan to use it. The most common sizes include 4×3 and 5×7. If you want to create content for Instagram, 1×1 could be your best option. For panoramas, you can try 16×9. If you don’t see the sizes you are looking for, you can set your own aspect ratio by clicking Enter Custom.
Once you select your preferred aspect ratio, the Crop tool will resize to match your chosen dimensions. So you need to follow this step before you begin to crop your wedding image. This way, you will have a general idea of how big your final image will be. You also have the option to not pick any selection and go with free form cropping as well. This option lets you crop your wedding image without any constraint.
Note: Cropping is not the same as resizing. With cropping, you remove a part of the image. With resizing, you keep the whole image intact but make it smaller. You decrease it both in terms of resolution and the file size. Both cropping and resizing are helpful individually, but they can also work well together.
2. Crop Your Wedding Photo
When you activate the Crop tool, a grid overlay with small grey handles at the corners will pop-up. Click on any of the handles to drag them to resize the tool. If you have already chosen an aspect ratio, move the image around until the elements you want are in the frame.
To change the size of an image without altering the aspect ratio, click the lock under the Crop and Straighten tool. If you want to do free form cropping, then choose the Custom option in the Aspect Panel. Make sure that you unlock the lock before cropping. This will allow you to crop the image to the size you want. Keep in mind that when you crop, the quality of the photo is affected. The more you cut out, the more pixelated it might look.
This becomes more noticeable when you are already working on low-resolution images. So if your camera is 12 megapixels or lower, don’t crop a lot from your wedding image. Even for high megapixel sensors, we suggest keeping your cropping to a minimum to avoid damage to image quality.
3. Use Crop Overlay

Cropping your image also means you have to recompose it. Lightroom overlays can help you rearrange your composition. By default, the Crop tool in Lightroom will show you the Rule of Thirds grid. If you don’t see it right away, go to Tools and select Tool Overlay from the drop-down menu. Click on Always Show or Show Selected to let the overlay appear over your image. If the Rule of Thirds doesn’t suit your work, you can try other overlays as well. For example, wide-angle images of a bride with a flowing wedding dress or images on a spiral staircase could use the Golden Spiral overlay for cropping instead of a grid.
To explore more cropping options, go to Tools again and click Crop Guide Overlay in the drop-down menu. You can also press the O letter on your keyboard. It’s not only quicker but also more efficient than clicking around the menu to change your grid. Pressing Shift+O could help you change the orientation of the Golden Spiral, Diagonal, and Aspect Ratio overlays.
4. Recompose Your Photo

After you find the overlay you want, drag your image until it aligns with your composition guide. One great thing about Lightroom overlays is that they automatically show up when you open the crop tool. As a result, you can recompose your image even if you haven’t cropped it yet.
For the images with grid overlays, you might want to place your subject where the lines intersect. For spirals, you might want your main point of interest to be where the squiggle ends. After you recompose your picture, click Done. Now, you will have a well-composed photograph. If you think you still need to rearrange your image, click the Crop tool again. You will see the full photo again with the crop overlay over it. Simply readjust and hit Done. You can repeat this until you are satisfied.
5. Straighten Your Wedding Photo

When you take pictures, you might notice that some of them don’t appear straight. Lightroom’s straightening feature can help you readjust them. There are two ways to straighten your images – one using the Angle slider and the other using your mouse to tilt the image.
To use the slider, all you have to do is move it to the left or to the right to make the image tilt. When your photo looks straight, let go of the slider and click Done. You can also simply move the image itself using your mouse. Place your mouse near one of the corners of your image. Once you see a curved double-arrow appear, move your mouse to the left or right until the image looks straight.
Keep an eye on the overlay while you are straightening the photos. Look for any straight line in your image and ensure that it is parallel with the grid. If it’s not, then this would mean that your image is still not straight.
6. Switch Orientation of Your Wedding Photos

Sometimes you might feel that a particular photo looks better in portrait orientation than in landscape. So what would you need to change your cropping orientation? All you’d have to do is to press X on your keyboard.
Once you change the orientation of your image, drag it around. Bring your main subject in the frame and then press Done. You will now have your portrait crop. You will need to press X on your keyboard when working with a specific aspect ratio. But if you chose to go with free-form cropping, you can just drag the box around until it becomes vertical. Changing the orientation of your wedding photo can affect its quality. If you cut off a big chunk of it, it might look grainy or pixelated.
Further Read: Best Lightroom Export Settings
The cropping and straightening features in Lightroom are some of the most commonly used tools by wedding photographers. When beginners start to learn editing in Lightroom, using these tools is often the first step. They can be used to ready a photo for Instagram or fix crooked photos for your couples. Plus, they can work like magic when preparing photos for printing.
Between booking more clients and photographing weddings, you hardly have time to keep up with hobbies. Outsourcing editing to ShootDotEdit will help you do just that! To learn more about how we can help your wedding photography business, you can check out our pricing plans.
Leave a comment