
What you see on screen does not always translate the same when an image is printed. Fortunately, there are options to check your pre-printed photos by soft proofing in Lightroom. That is why post production techniques involve soft proofing to ensure all images print as desired. What is soft proofing in Lightroom? We will explain in detail below, and we will also share how to use this feature in Lightroom.
What is Soft Proofing in Lightroom?
As a photographer, you have a library of stunning images after you come back from a wedding shoot. Sometimes your clients will purchase prints from the wedding day. Other times you may have them printed to hang in your studio.
It is not uncommon to follow the typical process after the wedding day (import photos to Lightroom, deliver to a photo editing specialist, receive them back, export the photos, and send an image to be printed only to be shocked or disappointed when you see the finished printed product. In this scenario, what you see on screen is not what you get on paper. Reprints can be expensive, causing you to lose money and fall behind on your deadlines.
The way a digital photo looks on screen after you import it into Lightroom is dependent on the computer monitor and settings. Similarly, the way an image will print depends on the type of printer that is used. Not all are created equal. However, the pre-press proofing process is an excellent way to take control over how printed works will turn out. That is where soft proofing Lightroom comes in to play.
Soft Proofing and Hard Proofing
The primary goal of proofing is to see how your digital photos will look when they are printed (after you receive them back from digital photography editing services, like ShootDotEdit). Pre-press proofing to check digital images that are ready to be printed can be accomplished a few ways primarily using either soft proofs or hard proofs, or both combined. For wedding photographers, is essential to use some proofing method to ensure the quality of the photos that are given to the bride and groom.

Soft proofing is the process where digital images are shown on screen as a close simulation of how it will be print on paper or other materials. Using editing software, a photographer can set up a profile to optimize the image based on the intended output device. The on-screen simulation is what is known as a soft proof.
Hard Proofs
Similarly, hard proofing generates a simulation of how a digital image will print on professional-grade equipment. However, this process produces a hard copy or hard proof of the image. Print companies often provide a hard proof for clients to review before printing the final piece.
Color Theory
You might still be wondering, “What is soft proofing in Lightroom?” Before going through the steps it takes to prepare an image for printing using soft proofing, it helps to have a basic understanding of color theory.
Color theory is all about how colors mix and the visual representation they create. This involves such aspects as hue (dimension of color such as red, blue, yellow), value (lightness or darkness of a color), and saturation (intensity of color). A color space is defined as a spectrum of color that appears in an image.
When you take a wedding photo, the image contains a whole spectrum of colors with different color hues, different levels of light and dark, and varying intensities of those colors. A single image could have a color space consisting of a spectrum of 100 colors to 1000 colors to millions of colors.
The more colors in an image, the smoother it will appear. This concept can be illustrated by the differences in screen quality of such things as the Atari video games of the 1980s and the Xbox 360 video games of the 2000s.
The same goes for different computer monitor displays and printers. Each has its own color profile, which specifies what color space it works within. When working with professional printing companies, they will often provide an International Color Consortium file (.ICC) that contains the color of the printing press that will be used to print your images. The file can be added into Lightroom so you can match your images to the color profile.
Lightroom Soft Proofing Steps
The steps to take for Lightroom soft proofing are simple once you have had a bit of an overview.
Step 1: Check Printer Color Profile
If the specific printer color profile is not already in Lightroom, you can upload it manually. On PCs, right-click on the .ICC file to install it. On Macs, put the file in the “Profiles” folder located at /Library/Printers/ColorSync/Profiles or for Mac OSX 10.12 and newer at /Library/ColorSync/Profiles.
Step 2: Enter Soft Proofing Mode
Click “Soft Proofing” button near your photo in Lightroom or hit “S” on the keyboard while in the Develop module to reveal the “Soft Proofing” screen. This will cause a whiteout of your image. In the module, you will see a “Profile” menu button. This is where you can go to pick the correct printer profile.

Step 3: Create a Virtual Copy
It is valuable to always make a copy of your photo so you can go back to the original. Lightroom is good about prompting you to do so when you first start soft proofing as well as when you go to save your image. There are even options to undo an action that was made, in case you want to revert to your original settings.
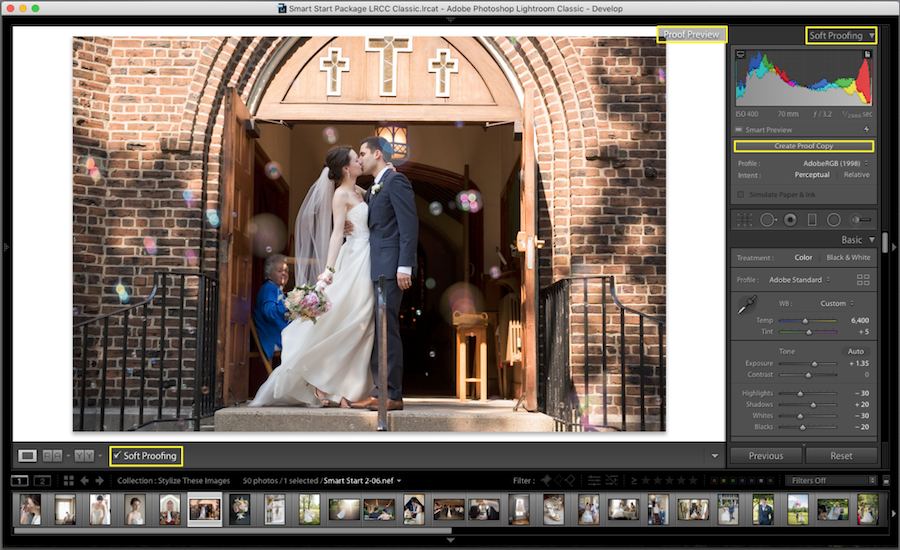
Step 4: Select Intent
The different types of Intent will be located as buttons in the module. “Relative Intent” causes the colors that are out of the spectrum of the printer to be adjusted to fit as close to them as possible.

“Perceptual Intent” shifts extreme colors so that it is closer to what a person sees naturally. You can also view how your image will look as printed on paper with ink by selecting “Simulate Paper and Ink” when available.
Step 5: Adjust the Image Based on the Histogram
There are two buttons you can select to view if there are any colors still out of the spectrum of the monitor and the printer. This gives you the opportunity to adjust any colors that may affect the printed image.

It is clear to see why wedding photographers would want to use soft proofing. A basic understanding of what is soft proofing in Lightroom is the first step. The key is to get all of the colors of your images to fit within the printer color profile and you will create a smooth workflow for images you want to print.
Leave a comment