
Once you finish photographing a wedding, the post-production work of importing, culling, and color-correcting the photographs follows. And once you are done with that, it’s time to export and deliver the final photos to your couple! Because there are multiple Lightroom export settings you can choose from for using images on different platforms, this blog will help you decide which export settings to choose and when.
How to Export Photos From Lightroom: The Initial Process
Lightroom saves the edits you have made to your wedding photos in the program itself. That is why when you exit Lightroom, it sometimes asks you if you want to back up the catalog. While this back-up saves your edits, you must export images using those edits in order to deliver a final product to your clients. Here are a few quick tips for beginning the export process in Lightroom and selecting the destination for export.
1. Select Images to Export From Lightroom

If you have a group of photos you want to export, you will have to:
- Select the first photo
- Hold down Shift
- Select the last image in that series, and your selection will be complete.
If your photos are not next to each other (i.e., not in order) and you want to choose only certain photos to export:
- Select the first photo
- Hold down Command on Mac or Control on PC
- While holding down Command/Control select all the photos you want to export
- After you have selected the photos for export, right-click select File, and select Export.

If you have exported some photos already and then want to export more using the same Lightroom export settings, you can use the Export With Previous option. As the name suggests, if you choose this option, Lightroom will use the same settings as the last time and add your photos to the ones you had exported earlier.
2. Select Destination for Export
When you export photos from Lightroom, whether it’s to a location on your computer or to an external drive, you will have to specify where you want the program to export your photos to. If you want to keep things organized, you can create different folders for each export. For example, a folder for social media, another for prints, another for exporting high resolution images, and so on.
Lightroom Export Settings For Various Purposes
When you export your pictures, there are many different settings to choose from, and they each have different purposes. For example, Lightroom export settings that generate Facebook-ready images will differ from high-resolution images you want to deliver to your couple. Here are a few of the more popular uses for images and the Lightroom export settings that go along with them.
1. Lightroom Export Settings For Print

When you are exporting your images for print, you want to ensure that you use the right Lightroom export settings to avoid pixelated or low quality prints. Export settings for print should be high resolution. To obtain a high resolution export, set the pixels per inch to at least 300ppi (pixels per inch).
- In Export Location, choose the location you want to export the photos to
- Choose the file type under File Settings
- Under Image Sizing, make sure Resize To Fit is not selected
- Under Image Sizing, change the resolution to 300ppi to get a high resolution photo
- Under Output Sharpening, choose Sharpen for glossy or matte paper, depending on your print type and choose Low, Standard, or High
- Do not select Watermark if you don’t want to watermark your prints
- Click Export.
2. Lightroom Export Settings for Websites

Follow the steps below to export website-worthy images from Lightroom.
- In Export Location, choose the location for export
- Choose the file type under File Settings
- Under Image Sizing, make sure to select Resize To Fit. Set the Long Edge 1600 pixels
- Under Image Sizing, change the resolution to 72ppi
- Under Output Sharpening, choose Sharpen for Screen
- Select Watermark to choose the watermark you want to use
- Click Export.
3. Settings for Facebook & Instagram Photos
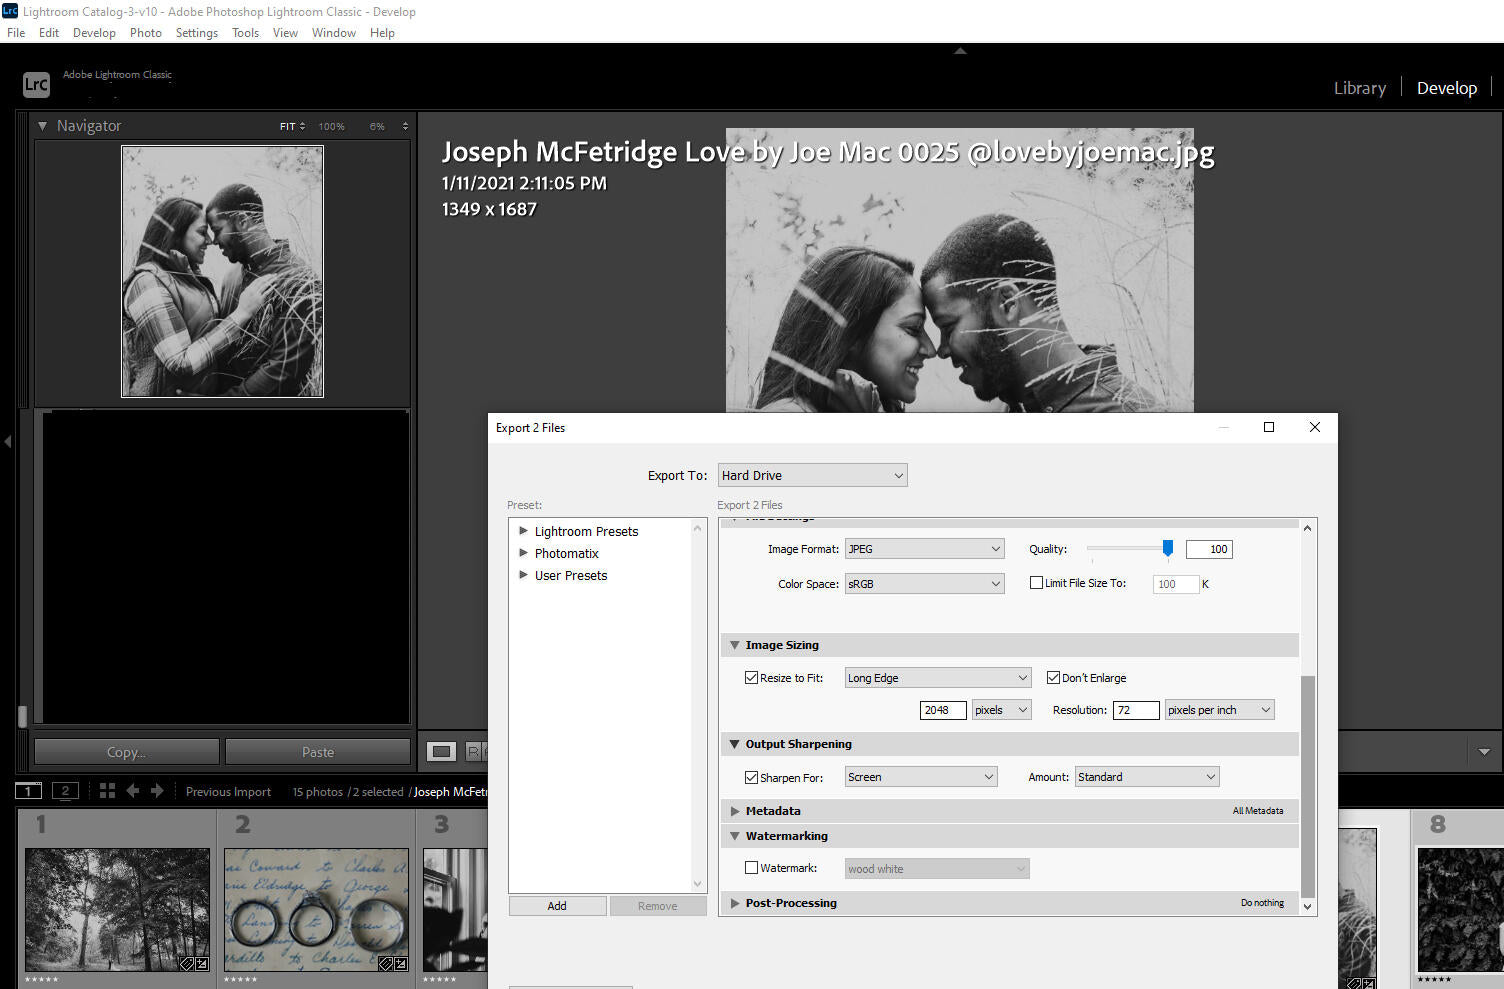
If you share your wedding photos on Facebook and Instagram, you need to size them using the export settings for the web to help the images load faster. Using smaller, low resolution images also prevents unintended image use and theft. Facebook recommends sizing your images at 2048 pixels on the longest side. To use the best Lightroom export settings for Facebook, follow the steps below:
- In Export Location, choose the location you want to export the photos to
- Choose the file type under File Settings
- Under Image Sizing, make sure to select Resize To Fit. Choose a Long Edge and type in 2048 for pixel size for Facebook. For Instagram, choose a Long Edge and type in 1000 for pixel size
- Under Image Sizing, change the resolution to 72ppi
- Under Output Sharpening, choose Sharpen for Screen
- If you want to watermark your image in Lightroom, select Watermark and choose the watermark you want to use
- Click Export.
Further Read: How To Select And Export Multiple Images In Lightroom
From importing the photos and culling to color correcting and exporting, the post-production process is a constant in the life of a wedding photographer. But since these processes are almost as important as taking the wedding photos, we want to help you get through the various post-production processes faster and more efficiently. We hope that this blog, which is the fourth and final blog in our post-production workflow in the Lightroom series, has helped make the entire post-production process easier. For a quick look back at the series, see below.
Part 1: How to Import Photos Into Lightroom and Create a Backup
Part 2: Culling Images in Lightroom, a Step by Step Guide
Part 3: Color Correction in Lightroom: An Overview
At ShootDotEdit, not only do we help you speed up your post-production process, but we also help to lighten your workload by editing your photos. To learn more about how we can help your wedding photography business, check out our price plans.
Leave a comment