
What are Lightroom Presets?
Presets are one of Adobe Lightroom’s most powerful features. With them, you can use the same settings to edit over and over again. Lightroom has presets for most of its features. There are Metadata presets, Import presets, Export presets, Slideshow presets, Watermarks, and more. The most common presets are Develop presets. These consistently apply the same edits to any image. Though you can make your own presets, there is a marketplace of presets made by other people. They are easy to install and great to use.
How to Import Presets Into Lightroom
There’s no reason why you should hold yourself back from trying some great presets. And quicken your editing process in Lightroom. So here’s how you can do it.
1. How to Import Develop Presets in Lightroom CC With Windows PC

- Download the chosen Preset ZIP file from a pre-purchased preset pack. Please ensure that the file is not unzipped. Some browsers unzip files automatically.
- Import the zipped file into Lightroom, not a folder.
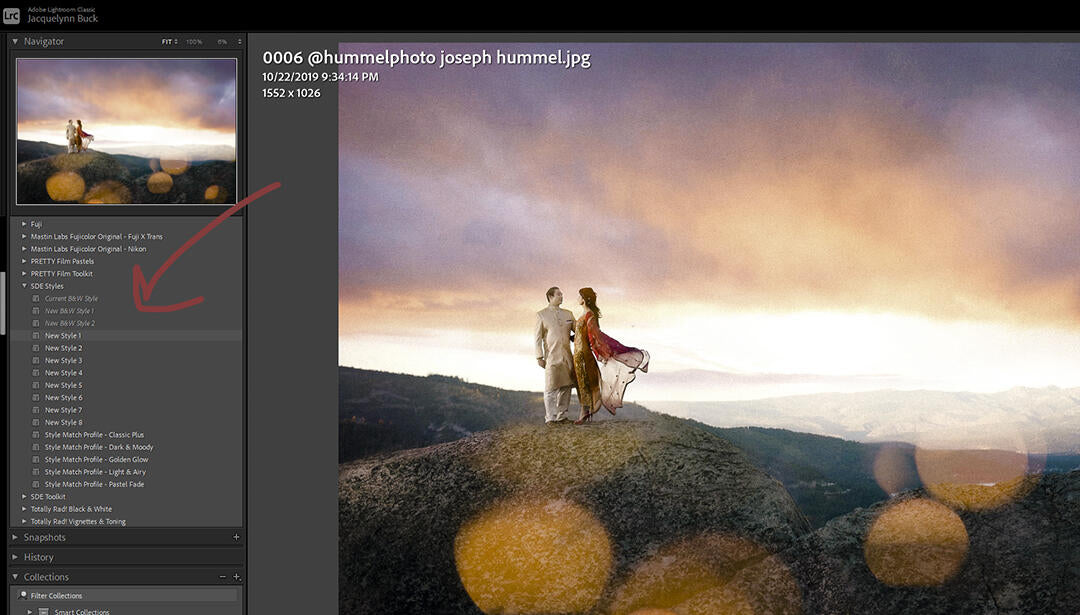
- Open Lightroom Classic and go to the Develop module.
- On the left panel, look for the Presets panel and click the small + icon next to it
- Select Import Presets from the dropdown menu
- It will open a window for you to find the ZIP file
- Simply find the ZIP file and select it and Lightroom Classic will import the presets
- Once the import is complete, you should see all the preset folders in your Presets panel
You can also sync the presets to the Lightroom iOS and Android mobile apps. But you need to install them on a computer first to sync them.
2. How to Import Develop Presets in Lightroom CC With Mac OS
- Open Adobe Lightroom CC
- Navigate to the left sidebar and find the “Presets” tab.
- Click the “+” icon.
- Select “Import Preset”.
- Navigate to your downloaded preset files and it’s done!
3. How to Import Develop Presets in Older Versions of Lightroom
Importing presets in the older versions of Lightroom is not very difficult. The same method applies to Lightroom 4, 5, 6, and Lightroom CC 2017. It is also very similar across both Windows and Mac. Follow the steps below to import presets to Lightroom’s older versions.
- Open Adobe Lightroom.
- Navigate to Edit
- Now go to Preferences and then Presets
- Open the folder named “Lightroom” and navigate to the “Develop Presets” folder.
- Copy your downloaded Lightroom presets into the “Develop Presets” folder.
- Restart Lightroom and you are ready to use the new presets now.
4. How to Import Other Presets in Lightroom
To add other presets into Lightroom, the process is a little different. The steps are as follows:
- Open Lightroom. On Windows, go to Edit > Preferences. On a Mac, go to Lightroom > Preferences.
- Open the Lightroom menu and click preferences.
- Select the “Presets” tab. Now, under Location, select “Show All Other Lightroom Presets.”
- On the presets tab, click show all other lightroom preferences.
- Navigate to the correct folder for the preset you want to add. For example, to add a slideshow template, you need to open the Slideshow Templates folder.
- Locate the presets you want to install
- Drag and drop the preset into the User Templates folder.
- Quit and restart Lightroom. Now the preset will be there ready for you to use.
5. How to Import Presets in Lightroom Mobile
With Creative Cloud subscription, this is what you need to do:
- Download Presets to Desktop
- Open Lightroom CC Desktop App
- Import Presets to Lightroom CC
- Let Presets sync With Lightroom Mobile
- Open Lightroom Mobile CC and check if they work
Without Creative Cloud Subscription, you will have to take a different route.
- Download Dropbox and iZip Application on iOS/Android
- Now download Presets on Mobile. This should automatically open up the Dropbox Application.
- After you click your download link, you will see a page that says “.zip files can’t be previewed. To open this file, open it on your computer”. No worries, you have an app that can unzip it.
- Tap on the three dots on the top right hand corner of the screen and select “Export”
- Now open the file in the iZip app. Next, select copy to iZip. If asked—”Would you like to extract all files?” Select “OK”.
- Now save these unzipped files to your phone.
- Go to the folder which has .dng files. Select all photos.Tap “Share” on the bottom of the screen, and then select “No”. This will keep the photos unzipped.
- Now choose “Save to Files”
- Open LR Mobile, Create New Album, and Import .dng Image Files
- Once you import the files, keep the folder open. Next, tap the three dots in the top right corner and select “Create Preset”.Tap “Select” and then tap “All”. Name the preset. Click the check mark in the corner of your screen and you’re done!
Where Can You Find Presets for Lightroom?

Presets are one of the Lightroom’s best features. Now you know how to import any presets you want. But do you know where you can get some great presets from? Here’s a list of our favorites.
These are a few from a vast sea of websites which offer some amazing Lightroom Presets. You can explore more to select the ones to suit your needs.
Advantages of Using Presets
Before you learn to import presets to Lightroom you should know about their benefits. This will help you understand the importance of using them, and how using presets can improve your post production workflow.
1. Presets Save You Time
When you use Lightroom presets, you’ll be able to instantly get your photos to an 85-90% edited state with one click. Sometimes you’ll be completely done with just one click. Rather than edit each photo from start to finish, you can use presets. All you have to do now is the fine-tuning part of the editing process.
2. Presets are Simple to Use
Learning any new software can be intimidating, and take time to master. But using presets will let you instantly get started in Lightroom. You will be able to edit your beautiful wedding photos in a simpler way than ever before.
3. Presets Offer Variety
Using Lightroom presets will give you a ton of creative variety right at your fingertips. You can see if your photo looks best in black and white or a sepia edit. Or maybe a vibrant color edit or a subdued vintage look. You can try different edits and see which style is most fitting for a particular photo, or even a full photo session. The best part is, when you hover over a preset, Lightroom shows you a preview of how that photo looks with the preset applied.
4. Presets Bring Consistency to Your Work
Editing each photo one-by-one can yield varying settings. It can give a disjointed look to your image set. So if you use the same presets across the whole shoot, this will give your images a uniform and consistent look.
5. Presets are Completely Customizable
If you have a preset you love, but you always have to slightly adjust the color or contrast, or maybe your own style changes over time, no problem! While editing with presets, any develop preset you use inside Lightroom is completely customizable and it’s as easy as a few clicks.
6. Presets Allow You to Experiment
In Lightroom all your edits are non-destructive. That means that your original unedited photo is always stored in Lightroom. So you can experiment as much or as little as you want. This won’t degrade the quality of your original image.
7. You Can do Batch Editing With Presets
One of the biggest benefits of using Lightroom is its ability to edit a lot of photos quickly by batch editing. It lets you sync your settings from one photo to many at once. If you combine presets with batch editing you can cut down your photo editing time.
Further Read: The Complete Guide To Essential Wedding Photo Edits
Keep Learning Lightroom With Us
We learn something new every day but it is so much more fun when we can put it to practical use. Learning Lightroom is one such thing. As a wedding photographer, you are always on a quest to make your images look better than before, and editing in Lightroom does just that. The best part is that with the knowledge on Presets you gained from our blog, you can improve quickly.
You can always create your own presets to match your style and brand. But if you are a beginner or like the ones available online, you can buy them right away. You always have the power to add your own touches to your image because no wedding photographer is like the other and one size doesn’t fit all.
We hope our Lightroom tips help you and urge you to learn more with us at ShootDotEdit. There is so much more on our Lightroom and Photoshop blogs that we can help you with. To learn more about our professional photo editing services designed for wedding and portrait photographers you can click here.
Leave a comment