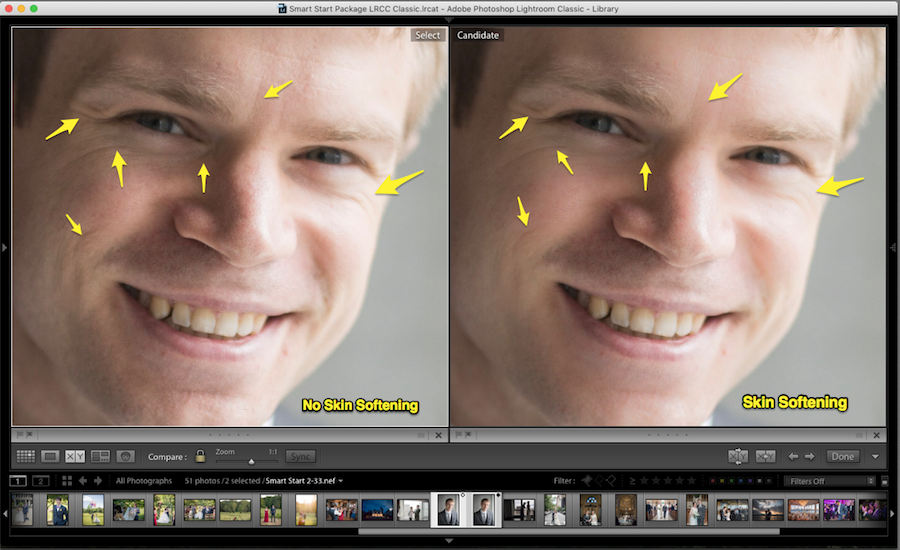
While some might be more familiar with skin smoothing capabilities in Photoshop, the process can also be done in Lightroom (which is especially helpful if you already work in Lightroom for your post-wedding workflow). Learning how to smooth skin in Lightroom can save you time and deliver results your clients will love.
How to Smooth Skin in Lightroom
Here at ShootDotEdit, we provide color correction services for wedding photographers and know how important it is to have the knowledge into some of the more complex aspects of Lightroom and adjustments that can be made to your wedding images. Below, we put together the best techniques for smoothing skin in Lightroom below.
Deciding on a Look for Your Photos
Retouching techniques in Lightroom can be used for different effects on wedding photos, and it can be helpful to have a sense of what styles complement your approach best. Your unique photography style will help you know what effects you would like on your photos, such as blurring the background or adding a vignette, and which you would not. Going heavy with the post-processing will result in a tighter, more commercial feel for your images, while a restrained touch will provide a more natural look.
Even the subject of a particular wedding photo might influence how much skin smoothing you might do. Every wedding shoot differs, as do the conditions that come along with them. Regardless, though, the brush tool is key for getting smooth skin in Lightroom.
Suggested Read: Behind The Scenes: Professional Photographer's Edit Stories
Getting Acquainted with the Brush Tool
Understanding the brush tool is a necessity when you want to learn more about how to smooth skin in Lightroom. The brush makes it possible to do exactly that. Similar to retouching skin tones in Lightroom, you can brush parts of an image to smooth it out in a manner you like best. In addition to selecting the correct effect (softening skin, in this case), adjusting the size, feather, flow, and density of the brush is critical to ensuring that the brush is not too strong or weak, and is the appropriate size to cover the area you want to smooth.

You can control each of these brush factors with the sliders underneath the brush tool option, and it will take some practice to get a sense of where to start and what settings work best. Those factors are not the only consideration to keep in mind, however, as there is also some prep work to take care of before getting started on this process.
Prepping Your Photo
Before you get a grasp on how to smooth skin in Lightroom, you want to give yourself the best possible product to work with. This means making a few adjustments to your photo first. You will want to properly expose your image, as an underexposed photo will have more noticeable blemishes and wrinkles to smooth out, so be sure to turn up the exposure via the adjustment bar.
In addition to that, you can properly crop your photo, adjust the white balance, remove inconsistencies (such as stray hairs) with the spot removal tool, and properly adjust other global image factors like the brightness, contrast, color saturation, and vibrancy
Tip: Outsourcing photo editing to digital photography editing services, like ShootDotEdit, can take care of the heavy lifting for your images, which saves you time overall (meaning all you need to do is make quick adjustments and deliver them to your clients).
Applying Basic Brush Fixes
With a balanced, well-adjusted photo to work from, the task of smoothing skin finally comes into play. Select the brush tool, and make sure you have auto masking selected. This option will detect the edges of your photo, so you can have an idea of where to apply your brush. Start with a weaker setting (reduced flow and feather), then begin.
As a general rule, you are looking to reduce the appearance of lines, wrinkles, and blemishes in the wedding photos. Though, depending on your style, you may want to remove them completely. If the latter is your goal, you will want to work to that gradually, increasing the intensity of the brush tool as you progress. Use a smaller brush to reduce the likelihood of going outside of the face area while smoothing, and pay attention to how your selected brush affects your subject’s skin.

To check your progress, use the overlay shortcut, which will bring up a colored display of the areas you have painted over with the brush tool. If you have covered everything and are satisfied with the appearance of your subject, it may be time to finish up. If not, you might have to give the skin a few more passes to achieve the level of smoothness you desire. Again, this is dependent on your personal and stylistic preferences.
Advanced Skin Smoothing
For more control over the quality of your subject’s skin, you will want to start engaging more the sliders and options for the brush tool. While they might be a bit intimidating at first glance, they are part and parcel for anyone trying to master the Lightroom smooth skin capabilities.
There is no one setting that will apply to every photo, though, so practice and experimentation is central to getting it right. Keep in mind that a stronger brush will result in more dramatic skin smoothing effects, and a weaker brush will have a less noticeable impact.

Knowing how to smooth skin (along with understanding additional wedding photo edits that can be used) in Lightroom is a benefit to most wedding photographers. It can take a considerable investment in time, however, so it is not something to jump into without practice. Take the time to practice your skills so you can have a fast and efficient process for your post-wedding workflow.


Leave a comment