
Take a minute to think about your current editing workflow. Chances are, you have needed to know how to rotate photo in Lightroom more than a few times. Of all the potential issues that could distract from the quality of your work as a wedding photographer, a crooked or badly rotated image can be one of the most challenging to identify and correct.
As a wedding photographer delivering images to clients, knowing how to rotate photo in Lightroom can be a valuable skill to have. As specialists in editing wedding photos, we want to provide you with a guide on how to rotate a photo in Lightroom to correct these issues. The following tips will not only help you produce better-quality images but can also help reduce the time you spend in your post-wedding workflow. Keep reading to learn how to rotate an image efficiently.
Reasons to Rotate an Image

Just like the reasons to crop a photo in Lightroom differs, various circumstances can create the need or desire to rotate a photo. These can range from camera settings and effects that may distort the image to the physical factors of the surroundings that prevent you from getting the straight-on photo that you wanted. In some cases, Lightroom rotate image adjustments can add that special touch to the image.
-
Elements in the photo appear slightly tilted. Whether your subjects are standing on a sloping hill or the camera is unintentionally tilted at the wrong moment, photos can end up slightly off center. This can often happen when shooting at the beach, and your horizon line is very evident. Even when the effect is subtle, it can distract from the overall quality of your photography work.
-
You want the final photo to be a mirror image of the original. In some cases, you may want to flip an image entirely, so that the left and right sides are switched. This is another situation in which you may want to use Lightroom to rotate your image.
-
You took the original photo at an angle. As a photographer, you are sometimes forced to take a photograph from an unusual angle in order to get the shot that you want. Maybe there is a particular object in the way, or you need the angle to fit in the full wedding party and the scenery within the frame.
- You want to use an angle to create perspective. A photo that is artistically angled then cropped can add a new perspective to the image while demonstrating your unique skill as a wedding photographer. Angles can emphasize your subjects or create a dramatic, gallery-worthy look.
HOW TO ROTATE PHOTO IN LIGHTROOM
The approach you choose when deciding how to rotate image in Lightroom will depend on how dramatically you want to turn your original image. The tools that Lightroom provides for this task vary from quick and dramatic rotations to more subtle, context-based tools to adjust your image.
In general, taking time to use the software’s more precise tools will provide you with the best results for your wedding photos and your clients.
1. ROTATING A PHOTO BY 90 DEGREES
One of the first ways you can adjust your image is to rotate it by 90 degrees. This option is by far the most basic and least nuanced of the ways you can rotate a photo in Lightroom.
Follow the steps below to find out how to rotate in Lightroom:
- Open Lightroom on your computer.
- Click the Develop tab (next to the Library tab). This will open the Develop module.
- Move your mouse to the top menu bar and click on Photo. This will cause a dropdown menu to appear.
- You will see two options on the dropdown menu.
- The first is to Rotate Left (CCW) and the second is to Rotate Right (CW). This selection will rotate your image clockwise or counterclockwise from the photo’s center point.
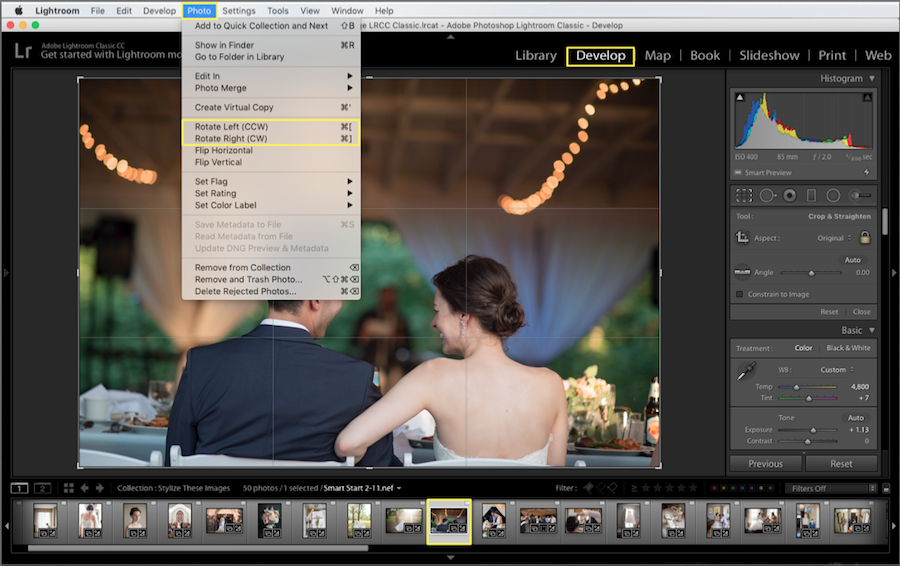
Image by Brian Hatton Photography
A. KEYBOARD SHORTCUTS
A few keyboard shortcuts you can use to achieve this rotation method are:
- For Mac: Command+< and Command+>
- For PC: Ctrl+< and Ctrl+>
B. ALTERNATIVE OPTIONS
Lightroom offers several options for rotating photos. Here are a few alternative options for rotating photos in Lightroom. Keep in mind, these will be used depending on your goal for the rotation of your image.
C. ROTATING A PHOTO IN THE LIBRARY MODULE
You can also rotate a photo by 90 degrees in the Library module, though you will have less control over the degree increments than you would in the Develop module. You also have the option to rotate one photo or multiple photos in the Library module.
2. ROTATING A PHOTO BY LESS THAN 90 DEGREES
If you decide to rotate a photo (or photos) by less than 90 degrees, there is an option to do so in the Develop Module. To achieve this goal, you can use the Crop and Straighten tool in Lightroom. The crop tool will help you to have more control over the rotation degree.
A. FLIPPING A PHOTO TO ITS MIRROR IMAGE
The next option is to flip the photo to its mirror image. This is another easy-to-complete option for rotating your clients’ wedding photos.
To flip the original image to its exact mirror, follow these steps:
- Open Lightroom on your computer.
- Click the Develop tab (next to the Library tab). This will open the Develop module.
- Move your mouse to the top menu bar and click on Photo. This will cause a dropdown menu to appear.
- Select Flip Horizontal from the dropdown menu. This horizontal flip can be useful when you want subjects or elements within the photo to be on a specific side.
- Any text added in Lightroom to be displayed should be added after flipping or it will also have a mirror effect and will not be readable.
- This also applies when you want to flip the image vertically. Simply follow the same instructions above, but select Flip Vertical instead of Flip Horizontal.
- Any text added in Lightroom to be displayed should be added after flipping or it will also have a mirror effect and will not be readable.

Image by Brian Hatton Photography
3. STRAIGHTENING A PHOTO IN LIGHTROOM
For most of your needs, the above rotations will be far too coarse. In order to know how to rotate photo in Lightroom the correct way, you need to be able to straighten it using more refined tools.

Image by Brian Hatton Photography
Within the Develop module of Lightroom, you will use crop and rotation in conjunction to compose a perfectly straight image. If needed, use the undo feature in Lightroom to start at the beginning and create the crop you desire for your photos.
Follow the steps below to straighten the image:
- The first step is to create a crop boundary using the Crop Overlay tool.
- You will then drag the photo into the crop frame you created to reposition it within the crop space.
- From there, you can rotate the image so its elements are straight in reference to the crop boundaries
- As you move and rotate your photo, Lightroom’s grid of thirds and a finer grid will appear to help you fine-tune the alignment.
A. UTILIZING THE AUTO STRAIGHTEN FUNCTION
A relatively new feature of Lightroom is the auto straighten function, which is located under the Crop tool option. This function is helpful for scenarios in which you need to straighten a horizon.
With the auto straighten function, Lightroom will identify the horizontal line and adjust accordingly. One thing to note about this function is that it must be a clearly defined horizontal line. Otherwise, the function does not perform as intended. The next option below may be better suited, depending on the needs of your image.
B. APPLYING THE PRECISE STRAIGHTEN OPTION
Similar to the auto straighten function, Lightroom has a precise straighten option under the Crop and Straighten section. This option works well for the scenario described above (the goal to straighten a horizon). To use this option, follow these steps:
- Click on the Crop and Straighten section. This is located on the right side panel.
- Find the spirit level icon and click on it.
- Click on a section of your image and hold down the mouse.
- Drag the section as needed and release the mouse.
- There will be a line for you to align with horizon. Adjust as needed.
- For any additional adjustments, use the slider located in the right side panel. For this part, you will need to adjust according to your end vision for the image. That may take a bit of working with the slider to achieve your goal.
C. USING THE ANGLE SLIDER OR ROTATE ICON
You can rotate photo in Lightroom using the Angle slider or the Rotate icon from the corners of the crop box. You can also rotate the image with the Angle tool by dragging the photo on a horizontal or vertical line.
To reset the slider back to zero, you can move the slider back to the middle. Or, you can click on the Angle button that is directly to the left of the slider.
In addition to these tools, you may also select the Constrain To Warp option to make sure that the crop frame stays in the photo area, which ensures that your image won’t be distorted.
4. MANUALLY INPUT ROTATION DEGREE
Another option you have to rotate the photo is to manually input the degree to which you would like the photo to rotate. In Lightroom, use positive numbers to rotate the photo clockwise. To rotate the photo counterclockwise, use negative numbers. This will help you have more control over the rotation you would like to select for the image.
QUICK TIP
As you work on perfecting the rotation of your photo in Lightroom, you can always reverse the edits by clicking on the Reset option in the Crop Overlay tool window. You can find the Crop Overlay tool window in the Develop module (a keyboard shortcut is to press D on your keyboard to get to the Develop module. This applies for both Mac and PC).
Once you are satisfied with the positioning and straightening of your image, click on the Crop Overlay tool to apply your changes. With some practice, you will start to develop a feel for how to rotate photo in Lightroom most effectively.
WHY YOU NEED TO KNOW THIS
Whether you are correcting an issue with the original photo or using an angle to add visual interest to a special image, you will need to know how to rotate photo in Lightroom the correct way. And like all processes, this will take time for you to master. Practice is key when it comes to Lightroom and the various options it offers.
The above guide is just the start of becoming an expert with straightening and rotation tools this powerful program offers. For more about editing in Lightroom, and what can be done to your wedding images, read through our comprehensive blog post.

At ShootDotEdit, it’s just the beginning of the value that we can offer you as a professional post-processing company specializing in wedding photography. From straightening out your best photos to helping you define and showcase your unique photography style, we can simplify your workflow and save you time and energy.
Our workflow is Lightroom-based and with the help of Lightroom Guru, Jared Platt, our team is trained on the best ways to use the software to create consistent edits. With our photo editing services, we help streamline professional wedding photographers’ post-wedding workflows. We also help save them time, which allows them to focus on more important parts of their photography business. Check our pricing plans to see how we can help your wedding photography business.
Leave a comment