
Here at ShootDotEdit, we understand the various lighting scenarios you face during the wedding day. And, not only are we a wedding photography editing service, we also love to provide you with tips and tricks from pro photographers in the industry. To walk you through how to light during various parts of the wedding day, we reached out to Leeann Marie, Wedding Photographers to discover her personal lighting techniques.

One of the leading wedding photographers in Pittsburgh, Leeann Marie has created an exclusive brand that is family focused for the cosmopolitan bride. She’s a national speaker for WPPI, has been in business for 9 years, and has a background in Industrial Engineering giving her a unique perspective on photography and business. She relies heavily on systems in her business to accomplish all of her goals, and has been a ShootDotEdit happy photographer for seven years. She lives in the city of Pittsburgh with her husband and daughter. She loves looking out her back window into the firefly-lit woods, and enjoying a night out for sushi and drinks with friends. Learn more about Leeann on her website and Instagram account!
Today, she will discuss how to set up proper lighting for the bridal prep and details for indoor wedding photography.
———————————————————————————
Wedding Photography Lighting
Welcome to the Wedding Lighting Master Class! This is the first article in the series, which I hope will help you to learn some valuable techniques for perfectly managing and lighting the different scenarios you will be faced with on a wedding day.
A few notes about this course:
FAST IS BEST
I truly believe that “Fast Is Best”, which is (obviously) why I love ShootDotEdit. 🙂 But really, one of the key valuable principles I bring to my brides and grooms each wedding day is an experience that is organized, hassle-free, and yet still beautifully lit and happy.
Keeping my lighting scenarios as fast as possible allows me to move between scenarios quickly, while still creating beautiful photography for my couples. I do use natural light, but I’m not afraid of flash in the least and work with tools and an arsenal of mental notes (lots of them that are described in this course!) to help me move between situations quickly and flawlessly.
THERE ARE OPTIONS
In the photography world, there are a million ways to light one simple scene. The methods outlined in this course are my personal preferences, and I encourage you to try them and then modify if necessary to fit your photography style and client needs.
WHERE YOU LIVE MATTERS
I work in Pittsburgh, Pennsylvania, which is an area subject to rain on summer days, snow in April, and 80 degree sunny days in November. I’m faced with varying conditions every single wedding (what photographer isn’t!?) and have to adjust all of the time.
For each piece of this master course, I have set out to identify my most common and most challenging situations I have faced throughout my career. Again, if you are looking to create a wedding photography experience that is efficient, but also way above and beyond what your couple’s ‘photographer friends’ can do – I think you are in the right place.
Try some of these tips. Study them. Modify them. Copy them. It’s all up to you – I hope you find all these examples and ideas helpful on your wedding photography journey.
Now… on to the good stuff
BRIDAL PREPARATIONS AND DETAILS
The first part of the wedding day (typically) is the wedding bridal preparation photos and bridal details shots. At this part of the day, I am working to establish repertoire with my bride and her bridal party as someone who is easy to work with and organized.
I try to keep my equipment light at this point in the day, because I don’t want to interfere too much with the natural interactions, and limit anything that may feel “intimidating” from a gear-perspective. I’ll typically enter a bridal suite with a small gear bag and only shoot with one camera at this point in the day.
I photograph details first (dress, shoes, jewelry), so that I am physically present in the space, but not yet focused on people. This allows everyone in the room to become familiar with me as the wedding photographer, but not feel like I am immediately shoving a camera in their face.
For the wedding details, I ask that they are all placed together upon my arrival, but often move them to a different location for photography. I am looking for easy, beautiful natural light at this point in the day. As a personal preference, I like to photograph wedding details in places that feel natural to where they would be found, and so I rarely go outside for details.
Related: Photography Lighting Setups During the Wedding Family Formals
MY TYPICAL WEDDING
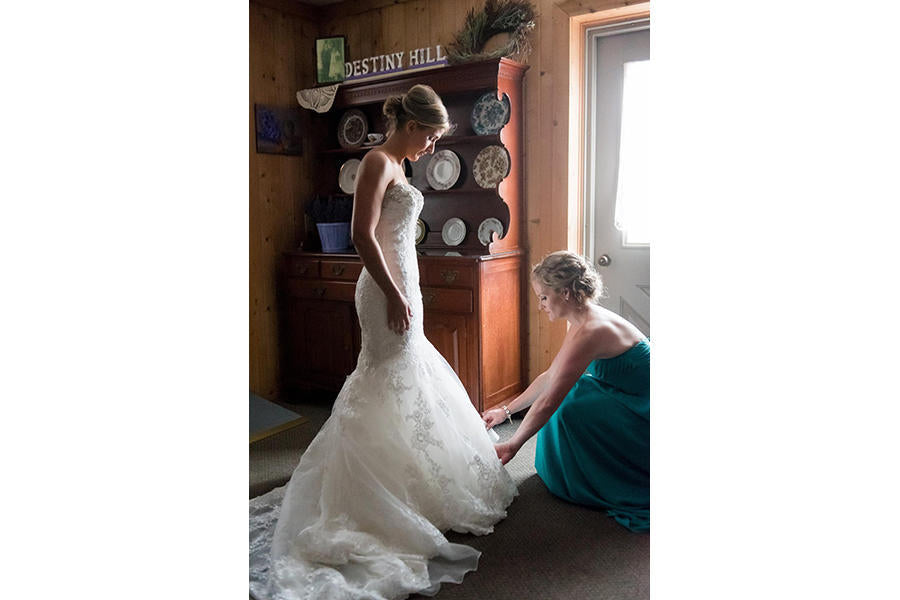
This bride was preparing for her wedding at a local resort, where the bridal suite was large, bright, and relatively uncluttered. There was plenty of working space, and I was able to open and close window sheers and blinds at my leisure for the bridal prep photos.
This is usually the easiest scenario I will work with, which is why I wanted to start with this wedding. This room does not have ‘mom’s stuff’ to work around, has a separate space to store bridesmaid bags, and allows me to easily and quickly create beautiful, clean work.
This photo gives you an idea of the room:

Scenario #1
Scenario:
Wedding Rings – create a sparkly, crisp, and visually interesting photo of the wedding rings.
Equipment + Technique:
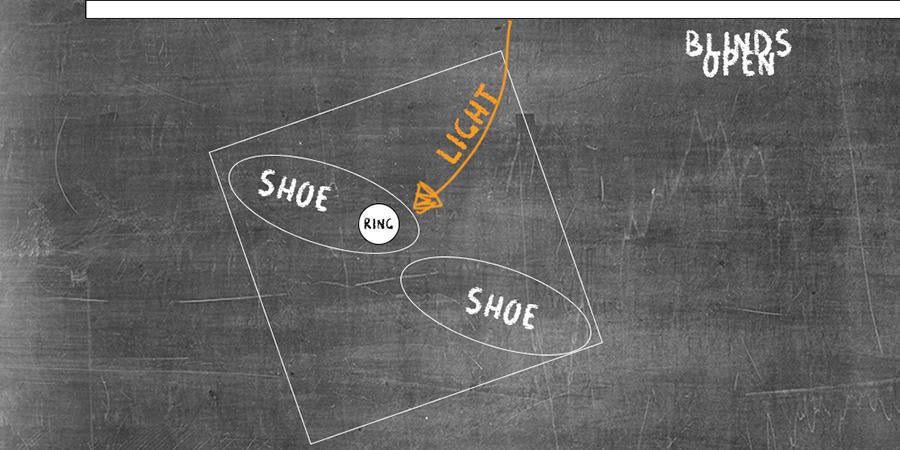
First, I closed some of the blinds in the room. There were two walls of windows, and I only wanted directional light from one of them. In order to create more contrast, I closed one set of window blinds for my detail photos (and throughout the course of the photography in the room). This is a personal preference, as I like more shadows to my work. If you prefer a more ‘light and airy’ style, you could keep the blinds on both walls open.
I positioned the rings on the open toes of the shoes, and the embellishment of one shoe in front of the other for foreground and visual interest. The shoes + rings were placed on a small end table about 1.5ft from the open window at a 60-degree angle.
‘Fast Is Best’ Time Estimate:
5 minutes: Close blinds, move the table, set up shot
Lighting Diagram:

Results:

Nikon D750, 105mm macro lens, ISO 2500, f/9.0, 1/250 sec
Related: When Things Go Wrong: Shooting in Dark Locations Without Flash
Scenario #2
Scenario:
Photo of the shoes – simple, classic, interesting.
Equipment + Technique:
For the sake of time, I just stepped back and photographed these in the same light and equipment as the ring photo – even leaving on the 105mm macro lens. I used the same lighting scenario and pulled it back with simple composition for the classic, well-lit shoe photo.
‘Fast Is Best’ Time Estimate:
1 minute. Remove rings, pull back for shoe photo
Lighting Diagram:
Results:

Nikon D750, 105mm macro lens, ISO 1400, f/8.0, 1/250 sec
Scenario #3
Scenario:
Photo of the dress – grand style, with simplicity and ‘real’ feeling.
Equipment + Technique:
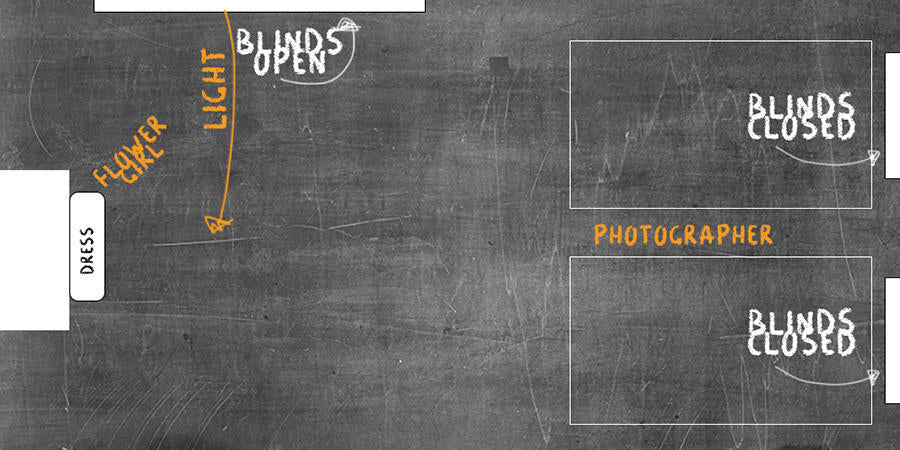
I photographed the dress in the same room since I had cleared it and the light was great. I moved my location so that I was between the two beds and facing the armoire against the wall. The light was still directional coming in from the one open window.
The dress was extremely heavy and had lots of detail. I knew that directional natural light would highlight all of the dress details. Once my shot was set up, I simply asked one of the flower girls to go over and touch each of the layers. It worked perfectly!
‘Fast Is Best’ Time Estimate:
3 minutes. No change in lighting, but had to get the dress setup and coax flower girl into position.
Lighting Diagram:
Results:

Nikon D750, 24-70mm lens, ISO 1800, f/2.8, 1/250 sec
Related: 4 Tips for Shooting with Backlight
Scenario #4
Scenario:
Makeup ‘final touches’ photo.
Equipment + Technique:
For this wedding photography lighting setup, makeup was being applied in a yellow, dark bathroom nearby. The light in there was terrible! I could have made something interesting with flash, but it was cramped and my bride was not interested in anyone else invading the small amount of space in the room. I asked the makeup artist and bride to step into the clean ‘shooting space’ when they were almost done for a final ‘makeup prep’ photo.
Again, I used the same light scenario that I was working with for details, because it was uncomplicated and giving me great results.
‘Fast Is Best’ Time Estimate:
10 minutes. Waiting for the client can sometimes take the longest, but once they were ready I knew exactly where I wanted them to sit and stand for the photo. It was a few simple clicks and she could move on to getting dressed.
Lighting Diagram:

This photo shows you where they were positioned in the room, with the large open window to the bride’s right, and the rest of the blinds closed, as previously done. To get the resulting photo, I simply moved to stand directly next to the makeup artist almost ‘peeking’ over his shoulder.
Results:

Nikon D750, 85mm lens, ISO 1250, f/1.8, 1/500 sec
Scenario #5
Scenario:
Candid photos of bridal party during preparations.
Equipment + Technique:
As I am photographing details, I am observing the bridal party to understand where they like to sit and what light they look best in. Also, I like to make sure that my gallery has some variety between dark/contrasty and light/airy, and simply adjusting the room light can change the look significantly.
For this photo, I observed two of the flower girls sitting on a bench at the end of one of the beds, and knew I wanted to capture them in a private moment – it was unscripted. In order to get the light I wanted, I walked over and opened the blinds directly above the beds to brighten up the room a bit. I then crouched near the other bed’s bench and waited for the girls to interact in this beautiful way.
‘Fast Is Best’ Time Estimate:
Again, waiting was the longest part of this photo, but simply opening the blinds and finding my position took 2 minutes.
Lighting Diagram:

Results:

Nikon D750, 85mm lens, ISO 1250, f/1.8, 1/800 sec
EXCEPTIONS
As we all know, these kind of rooms are sometimes few and far between. There are so many different scenarios we can be faced with as wedding photographers, and we just don’t have a say in where our brides ultimately get dressed! In this section, I’m going to show you how I tackled the exceptions – different types of rooms, light, and style.
If I had my choice, I’d always be in a bright, clean room where I can control the light to my own stylistic needs – but that doesn’t happen! Here are some exceptions and how I tackled them quickly. Keep these tools in your ‘go-to-on-a-wedding-day’ belt.
Related: 5 Tips for Lighting Images in Any Location – get them here!
Scenario #6
Scenario:
Church basement. We needed a few photos while the bride was in her final preparations, but church basements are notoriously un-pretty!
Equipment + Technique:
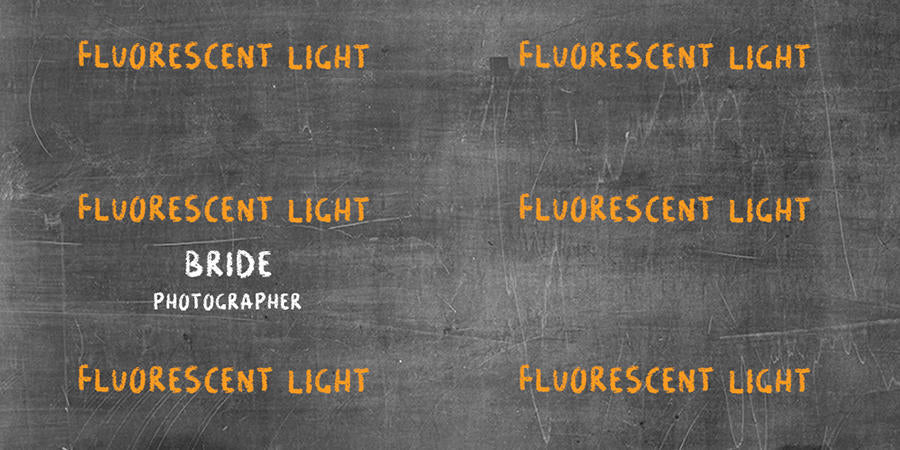
I like to shoot ‘tight’ in these kinds of scenarios because that style will naturally help me to exclude ugly backgrounds (daycare setups, tile floors, folding chairs – you name it!). For this photo, I used the ambient light, which was just overhead fluorescent – ew! However, the room was bright from these lights, and I knew if I photographed the scene at a high enough shutter speed, I could beat the fluorescent light refresh rate.
Shooting in RAW, this was easy to white balance and deliver to my client for the moment it captured as she put on her wedding veil.
Also try: I love MagMod products, so if you have time in a church basement, you would play with the grids on flashes to create something interesting, while omitting distracting background elements.
‘Fast Is Best’ Time Estimate:
2 minutes. Adjust camera settings and wait for the moment. Ambient Light.
Lighting Diagram:


Results:

Nikon D750, 24-70mm lens, ISO 6400, f/2.8, 1/1000 sec

Nikon D750, 70-200mm lens, ISO 6400, f/2.8, 1/500 sec
Related: 5 Tips to Identifying the Characteristics of Photography Lighting
Scenario #7
Scenario:
Family home. The bridal party had taken over the house, and lots of the rooms were filled with furniture. The “bride’s room” had red paint on the walls. Oh, my!
Equipment + Technique:
I needed to really brainstorm to find a location for photos. This was a challenging scenario! The parents’ bedroom (which is usually the largest bedroom in the house) was off-limits, and the bride’s room was painted red, with a small window blocked by a queen bed. The rest of the home was filled with bridal party and visitors, and so the only location with good light was the landing at the top of the staircase.
The staircase was in the front entry of the home, and so there was a high window on the second level of the house that lit the landing. There were family photos on the walls and little room for movement, but it was the best I could work with.
I asked that the rest of the bridal party wait in the living room (the bride wanted to have a ‘grand entrance’ in her dress, so it was important that no one saw her on the landing), and asked for just the bride, her sister, and her mom on the landing. I used my 24-70 while they prepared since I was also close to them, and moved around as much as I could.
‘Fast Is Best’ Time Estimate:
It took me about 10 minutes to figure out exactly where I wanted them to get ready and clear the space, but then we were ready to go!
Lighting Diagram:


Results:

Nikon D750, 24-70mm lens, ISO 6400, f/2.8, 1/200 sec

Nikon D750, 24-70mm lens, ISO 6400, f/2.8, 1/160 sec

Nikon D750, 24-70mm lens, ISO 6400, f/2.8, 1/125 sec

Nikon D750, 85mm lens, ISO 2500, f/1.8, 1/250 sec

Nikon D750, 24-70mm lens, ISO 6400, f/2.8, 1/200 sec
Scenario #8
Scenario:
Getting ready room is standard, and I was looking for something different and more interesting to create something ‘different’ than what every wedding at the venue contains.
Equipment + Technique:
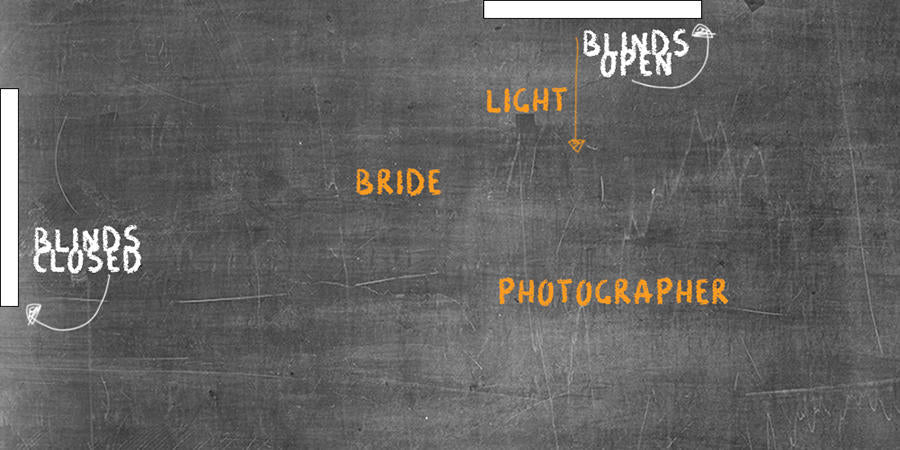
For these getting ready photos, I really wanted to create something different. The bride was marrying into the venue owner’s family, and so I wanted her gallery to look different than all of the other weddings at the venue. There is a ‘bridal suite’ on the property, where I first found my bride and where she expected to get ready. However, I asked her to step downstairs into the bridal consultation meeting room – not what anyone was expecting!
However, there was one window in the room and the rest of it could be dark. I knew that this could create some interesting contrast above and beyond the ‘light/bright’ bridal suite. We did do photographs in the bridal suite, but then did something different for the final photos.
The usual bride suite:

‘Fast Is Best’ Time Estimate:
It did take me a few minutes to figure out that this space would work, just deciding exactly where I’d ask the bride to sit + stand for the photos. I closed the entry door’s curtains and made sure that no one would enter unexpectedly. Total time to setup light = 2 minutes.
Lighting Diagram:
Results:

Nikon D750, 85mm lens, ISO 200, f/1.8, 1/640 sec

Nikon D750, 85mm lens, ISO 6400, f/1.8, 1/1000 sec

Nikon D750, 85mm lens, ISO 1250, f/1.8, 1/640 sec

Nikon D750, 24-70mm lens, ISO 250, f/2.8, 1/640 sec

Nikon D750, 24-70mm lens, ISO 1800, f/2.8, 1/640 sec
Scenario #9
Scenario:
Hotel Lobby for bridal portraits.
Equipment + Technique:
We photographed bridal details in the upstairs suite, which were photographed natural-light as described previously. However, the bride asked for some portraits in the hotel lobby. The hotel lobby is a little dark, and typically lit with a ‘pink’ toned ambient colored light. I wanted to create something well-lit and beautiful for her to showcase her venue.
I had with me a Profoto B2, Light Stand, and 1,3’ by 1,3’ softbox on-hand, so I used this at the time to setup an off-camera option on the fly. I love using my B2 with softbox for both portraits and reception (which I’ll get to later!)
Also try: I did not have my MagMod products at the time, but a flash with grid + sphere on it could also do the trick and be a little lighter. Since I’m not having to combat a lot of ambient light in this scenario, I could have used a speedlight for photos with a little less weight to the setup.
My Profoto is triggered with the AirRemote TTL-N, and I shoot in TTL for the flash power.
‘Fast Is Best’ Time Estimate:
5 minutes for Profoto setup / 5 minutes for tear-down
Lighting Diagram:

Results:

Nikon D750, 85mm lens, ISO 2500, f/1.8, 1/160 sec

Nikon D750, 24-70mm lens, ISO 2500, f/3.2, 1/250 sec
———————————————————————————
With the knowledge of how to properly light in any location, you can use light to create images your clients will love every time. What are other key lighting tips you need to succeed during your wedding shoots? Our free Lighting Guide for Wedding Photographers shares how to quickly identify light in any scenario and use it to create images you desire. Click the banner below to download it today!

Leave a comment