
Using RAW files can enhance the quality of your wedding photographs. In order to manipulate the files, you will need to use imaging software, such as Adobe Photoshop or Lightroom. Many photographers choose Lightroom for this because it offers more advanced storage and organization options. Keep reading to learn how to import raw files into Lightroom. We want you to become a pro at Lightroom or Photoshop, but we also know it has to start with the basics, like How to Import RAW files into Lightroom. And when you’re ready for more, we’ll be there for you too! Because even though we at ShootDotEdit love doing the wedding photo editing for you – and our wedding photo editing prices are some of the best in the industry – we know that you have to keep up on your editing skills so you can make select images that impress.
How to Import RAW Files into Lightroom
Below is a step-by-step process that explains exactly how to import RAW files into Lightroom, and a few extra hints to make your wedding photo import process as seamless as possible so you can share your unique photography style with clients.
What is a RAW File?
A RAW file is simply the type of image saved to your camera when you take a photo.
A more commonly known type of image file (that’s often used by wedding photographers) is a JPEG photo. JPEGs come with plenty of limitations. One way that you are limited by JPEGs is the quality of the file and the information that is included in each file. When shooting with JPEG, many aspects of the images cannot be corrected with the original file, such as lighting, image quality, color balance, over-processed images, and lack of detail.
What is Lightroom Anyway?
Adobe Lightroom is an image file editor, organizer, and publisher. You can import your RAW files right into Lightroom and a photo editing company, like ShootDotEdit, can edit them from start to finish. After you receive your images back, you can also publish them directly from Lightroom (instead of saving them to your hard drive or the Cloud first; although this is a recommended step to secure your files) and even add your metadata and keywords to your files right in the program.
Many photographers prefer Lightroom over Adobe Photoshop because Lightroom allows them complete control over their photos. Understanding how to import RAW files into Lightroom is the first step to creating a fast and efficient workflow alongside your wedding photo editing company.
Steps to Import RAW Files into Lightroom
While managing photos in the program is a breeze, understanding how to import RAW files into Lightroom can be a lengthy process. To start, you will need to import your files into the program and choose which photos need to be manipulated with Lightroom. Luckily, the Lightroom import settings are fairly straightforward. And, a wedding photography editing company is prepared to take on the rest of the work for you once your files are imported.
Step 1: Connect your internal storage device (such as a USB card or your camera) to your computer and open the Lightroom program. An import window should automatically pop up in the program when it detects your external storage device.
Step 2: Select the source from which you would like to import the RAW photos. Lightroom will detect any source attached to your laptop, so you will need to specify which source you want to use. You can also choose if you want Lightroom to eject your source after you are finished importing your files.

Step 3: A box should pop up with thumbnails of all of your photos. If your photo has already been uploaded into Lightroom, the thumbnail will look gray. The tricky part about Lightroom is that it cannot distinguish between photos based on the image qualities, only the names. This means if you have two of the same photos with different file names, Lightroom will think they are two separate photos. That is why it is so important to create a naming convention structure for your photos as you import them into Lightroom.

Step 4: From here, you can move, copy, add, or copy as DNG files. “Move” means that you want to remove the files from your source and move them to Lightroom. “Copy” means that you want to copy your files and keep your original formatting. “Add” means that you will not move the file but simply work with the file in Lightroom. “Copy as DNG” means you want to copy the files to Lightroom in the Adobe file format.

Step 5: Choose your preview quality and decide if you want to use Smart Previews (this allows you to post process a file and makes it easy to partner with a post production photo editing company, like ShootDotEdit).

Step 6: Rename your copied files.

Step 7: Decide if you want to Develop Preset on your images or view the thumbnails as RAW files (this, too, is something you can work with an online photo editing service to add to your images and represent your unique photography style).
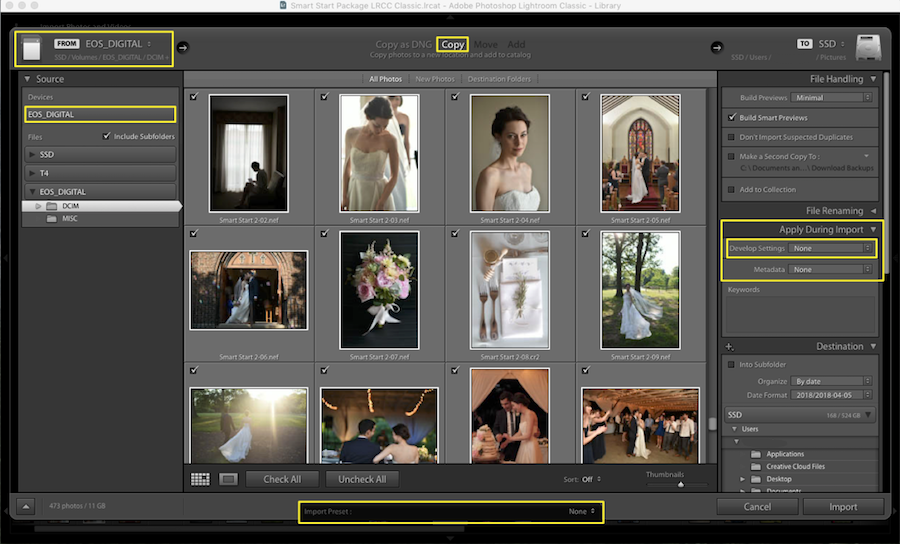
Step 8: Type in your metadata and choose the keywords you want to be associated with your file. (Once your images are imported, you can also add text, watermarks, and more.

Step 9: Choose the location where you want your copied files saved (if you’re working with copied files).

Step 10: Click “import” to finish the import process. Once the import process is complete, you can then take the steps to export your wedding images.

Additional Tips
Here at ShootDotEdit, we specialize in post production services for photographers. We also provide valuable tips and tricks to make your post-wedding workflow as streamlined as possible.
Your post-wedding workflow is one of the most time-consuming areas of your business. Luckily, there are plenty of shortcuts and features built into Lightroom that can make the process slightly easier, such as shortcuts for your post-wedding workflow. Trying to figure out how to import RAW files into Lightroom can be a lengthy process. Many photographers turn to a post production photo editing company like ShootDotEdit to handle the rest of the grunt work and let them focus on the fun part of photography, like shooting the wedding day.
Further Read: The Best Photo Color Correction Services By ShootDotEdit
And before you go, what other photo editing techniques can be applied to your wedding photography? We have a list of our top picks for editing techniques that can change your photography here!
Leave a comment