
Along with whitening teeth, retouching skin is one of the most popular requests or needs in wedding photography. As a wedding photographer, knowing how to retouch skin tones in Lightroom effectively and naturally can help you produce even better final photos and boost your photography business.
How to Retouch Skin Tones in Lightroom
Here at ShootDotedit, we provide photo editing services for professional photographers. Our color correction services provide you with fast and personalized editing, including retouching skin tones and more, which is meant to take the burden (and time!) of editing off your plate so you can focus on more important areas of your wedding photography business.

The basic steps we lay out for editing skin tones may seem deceptively simple, but doing so the right way is a talent that will take trial and error to truly perfect. And although trusting a specialist with your wedding edits provides you with consistent images and a streamlined workflow, we know that it is important for you to know how these processes work.
Throughout this post, we will provide you with several basic processes used to retouch skin tones within Lightroom’s toolset. Keep reaching to learn how to retouch skin tones in Lightroom.
Common Reasons for Retouching
Different circumstances can create the need, or the request from your clients, to retouch skin tones from your original photographs. These can range from fixing small blemishes on the skin to addressing color issues created by natural or artificial lighting or shadows. The type of skin retouching you perform will depend on the specific issue that you are addressing.
Related Read: Behind The Scenes: Professional Photographer's Edit Stories
Retouching with Color Curves
Where shading and lighting have dramatically influenced the overall coloring of an entire image, Lightroom’s Color Curves are likely the best way to correct those issues. In general, the Color Curves are the ideal place to start with resolving more dramatic color issues with your photos. The benefit to this approach is that a few carefully selected changes can make a significant difference in your final photos. Here is how to retouch skin tones in Lightroom with Color Curves.
1. Identify the Current Color Balance and Issues
Before making any changes to the image, especially with the Color Curves tool, you will want to know where the color issues are occurring and what those issues are. The Develop module of Lightroom provides you with this information: by hovering over any point in the image, Lightroom will tell you the percentages of red, blue and green, and these help you identify the color balance issues.

For skin tone, red should have a higher percentage than green, and green a higher percentage than blue. This is true for all skin tones. Colors that measure 94% or higher indicate an underexposure, while colors measuring 6% or below mean you have an overexposed image. Each value should also be at least 2% different from the next color.
2. Correct the Exposure of the Photo
Exposure is the first problem to address when it comes to correcting color, as it affects all other colors. Trying to correct specific skin tone issues in Lightroom before dealing with underexposure or overexposure will result in a less than ideal outcome.
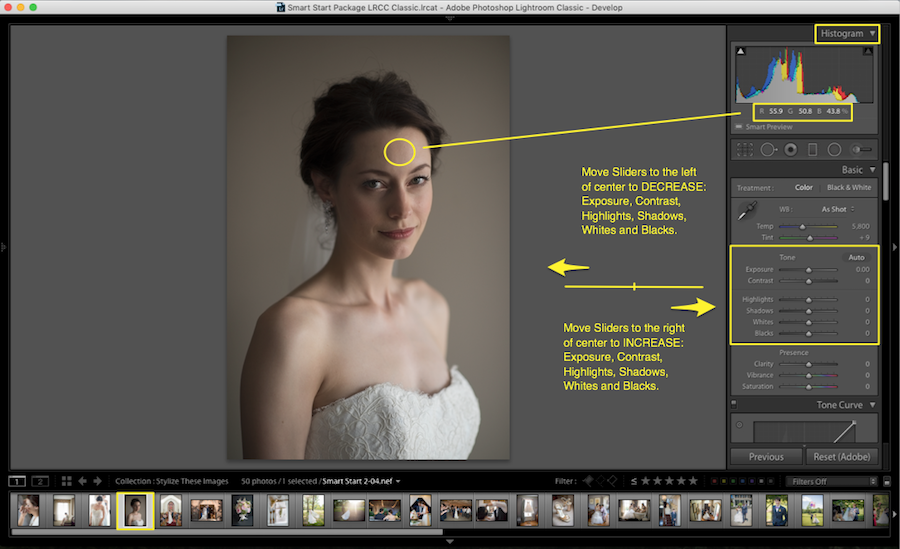
To correct exposure issues in your photos, Lightroom provides a convenient Exposure slider that allows you to adjust exposure on a scale as needed. For an overexposure, you will want to decrease the exposure value (negative number) and for underexposure, that number needs to increase (positive number). As you make these changes to the Exposure level, you can make sure your adjustments are reasonable by ensuring that it moves the color levels above into appropriate ranges.

After settling on the right value for Exposure, you can further adjust the color balance by making changes to the levels of each of the Highlights (shadows, whites, and blacks). These settings can further fine-tune the overall color balance. Even with these multiple broader adjustments, you may need additional corrections to get skin tones just right – which is where you will apply the Color Curves.
Keep in mind, if you make mistakes as you go, you can always use the undo feature in Lightroom.
3. Use Color Curves to Finalize the Color Correction
Compared to Exposure and Highlights, Color Curves have several advantages when it comes to perfectly correcting the color of your wedding photographs. Color Curves not only allow you to edit the balance of red but also to adjust colors in one tonal region, without affecting that color globally. These more refined edits are the key to color-balanced images and skin tones.
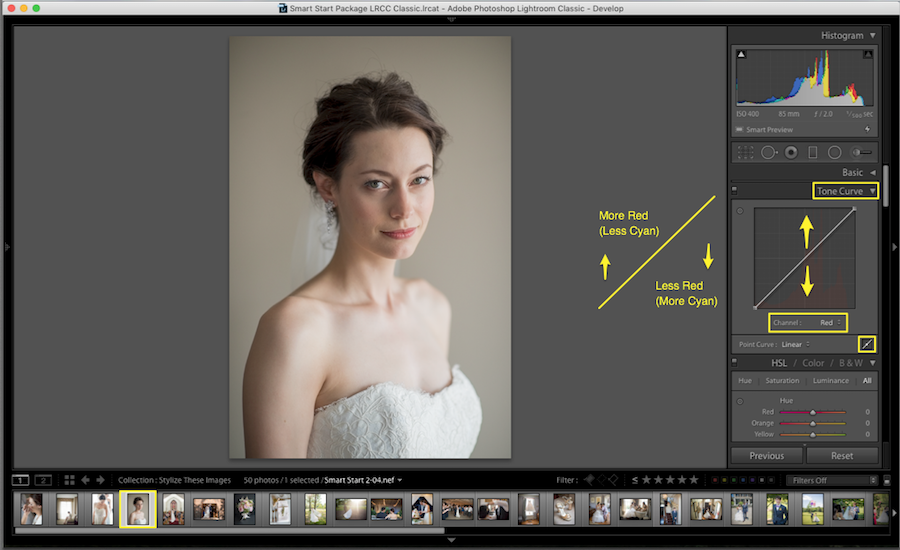
From the Curves panel in Lightroom, you can edit the overall color curve as well as the Red, Green, and Blue Curves individually. This is accomplished by changing the shape or curve on each of those separate curves. Dragging up an individual color channel increases the amount of that color in the image while pulling the curve down increases its opposite. Blue balances yellow, red balances cyan, and green balances magenta.


For the more detailed adjustments that will really allow your future color correcting skills to shine, you will want to take it further, with the Highlights, Lights, Darks, and Shadows sliders that let you continue to refine each curve. It is these sliders that allow you to have the most control over the color in various sections in your images. While it may take longer to learn color adjustments with the more finite sliders, it can have a significant benefit to your work. The time you take to really explore these adjustments will show in the final images that you release (learn how to export your photos from Lightroom once they’re finalized here).
Final Tips for Overall Color Correction Using Curves
In order to get the best results from correcting overall image color and skin tone issues with color curves, there are some best practices to keep in mind:
- There are no ideal percentages for the Red, Blue, and Green values in your image or on skin tones. The right settings can vary greatly depending on factors such as your location, lighting, and skin tones in the image.
- More important than the actual percentages are the relationships and balance between the 3 colors.
- It will take some practice to be able to compare different changes to the colors and make the best decisions for correcting color in each photo.

Quick Tip
Outsourcing photo editing to an expert, like ShootDotEdit, ensures all of these steps are taken care of for you and your unique photography style is shared with your photography clients!
Retouching with Luminance
Another way to address overall skin tone or color issues in photos, especially portraits, is through focusing purely on the White Balance, Exposure, and Luminance settings. Although these 3 settings together do not compare to the power of using the Color Curves mentioned above, they can be helpful for quickly applying overall changes to the balance of color in your photographs and in skin tones in particular. Here is how to retouch skin tones in Lightroom with luminance.
1. Adjust the White Balance of the Image
In this suggested approach, you will begin by adjusting the White Balance to the ideal level. White Balance that is too warm results in skin tones that are unnaturally orange or yellow, while low White Balance adds a blue/gray tint to the skin. To adjust the White Balance, click on the adjustment tool, then click on any part of your image that should be white.
From there, you can further adjust the white balance, whether it is still too warm or too cool. The temperature slider provides a convenient adjustment from warmer to cooler skin tones. In some cases, you may also adjust the tint along with the White Balance adjustment tool and slider to get the perfect skin tone in your image.
2. Adjust the Exposure of the Image
As mentioned above, proper exposure in a photograph is essential to having the right skin tones in your final images. While some suggest that the overall exposure curve should reflect a bell curve, most images are more nuanced and require further fine-tuning than that. Photographs with higher contrast between background and foreground elements will have spikes in the Exposure curve, even when properly exposed.
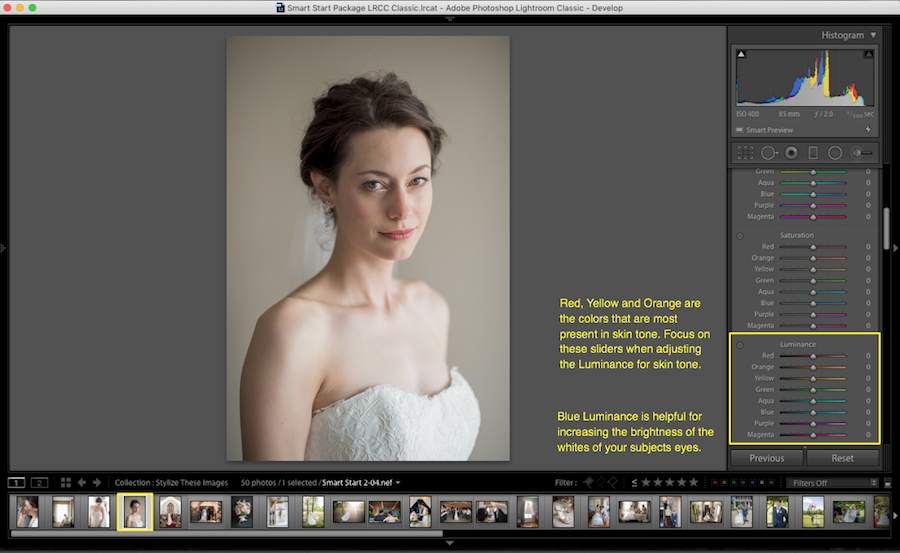
3. Adjust the Luminance of the Image
This adjustment feature of Lightroom in particular addresses the brightness of the skin. The Luminance slider is part of the HSL panel in Lightroom; Luminance is increased for each color you move its slider to the right. To adjust the brightness of skin tones only, you will want to focus on the color tones that are most evident in the skin.
Retouching Specific Skin Issues
As well as correcting overall image color issues that influence skin tones, as a wedding photographer, you will also want to be able to address specific skin issues such as blemishes, red spots, or other more detailed issues. Though there are additional ways to fix issues that happen in the background (an effect such as blurring, for example), properly retouching skin in these cases will require a different set of tools. Here is how to retouch skin tones in Lightroom when dealing with specific issues.
Remove Acne and Small Scars with the Clone and Heal Tools
Lightroom’s Spot Removal tool allows you to repair a specific area of an image by using the color and context information from other parts of the same image. These tools are commonly used to remove unnecessary objects or people from images, but they can also be used to remove acne and other small scars from the skin.

The 2 options for the Spot Removal tool are Clone and Heal, which use different processes to accomplish similar results. The Clone option simple duplicates the sampled area of the image to the area that you have selected, replacing it with an exact copy. The Heal tool is more fine-tuned and often a better option for removing blemishes, as it intelligently matches facets like texture, lighting, and shading to the corrected area.
Soften Skin with Lightroom’s Preset Tool
Another way to address skin issues in your photography is by using Lightroom’s tool for skin softening. This preset feature within the program can be found in the “Custom” options of the program’s brush tool. By softening the skin in your photos, you can reduce the effect of some color issues and blemishes as well, though addressing them specifically is generally the better method.
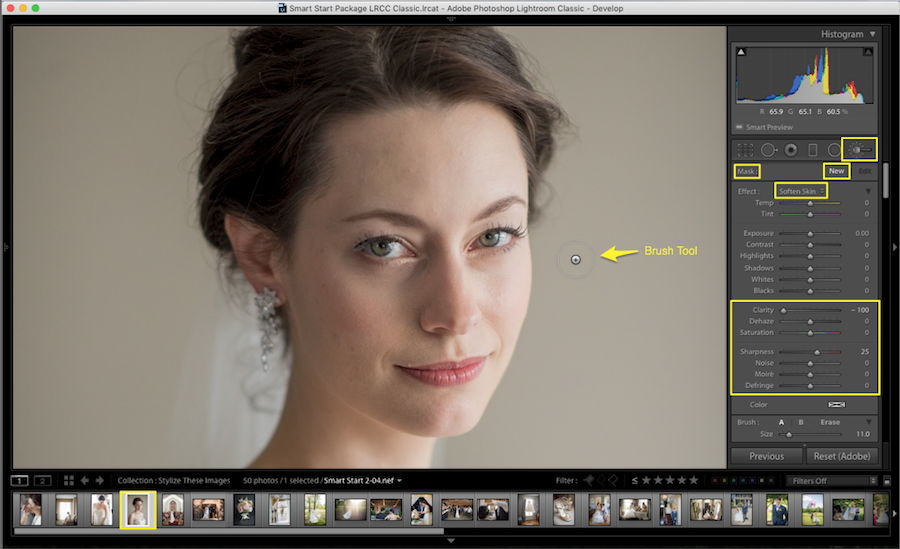
To apply the skin softening preset in Lightroom, select the effect then brush over the skin. You can use clarity and sharpness settings to refine the effect to create your desired look, and Auto Mask can help with detecting edges to keep only the skin affected.
Making More Finite Adjustments
In some cases, the skin tone and blemish issues in your wedding photography, once imported in Lightroom, may require more robust and fine-tuned features than what Lightroom provides. In these cases, you will want to make the changes you can with the features above in Lightroom, then export your edited image to another program, such as Photoshop.
Lightroom is designed not only for editing photos but also for improving your photo editing workflow and photo management system. As a result, the program makes it easy to export your edited Lightroom images into other programs, like Photoshop, for further processing. While you can use Lightroom’s Export menu to send altered photos to another program, or to your professional photo editing and color correction services, the best practice is to do so right from the main editing menu in Lightroom.
Knowing how to get perfect skin tones in Lightroom is an essential skill for any wedding photographer. In order to truly perfect skin tones for glowing brides and perfectly brightened grooms, you will need a deep understanding of all the facets of your image that influence skin tone. The elements mentioned in this guide and tools used to correct them are only the start of the options you can take advantage of with Adobe Lightroom.
For new or even experienced photographers, the challenge of how to fix skin tone in Lightroom appropriately, along with many other commonly-requested wedding photo edits, can be a time-consuming and therefore costly one. While it is our hope at ShootDotEdit that this article will start you in the right path toward better skin tones in your photographs, we know that any post-processing time takes away from what you most enjoy: taking photos that capture the most memorable moments of an incredibly memorable day.
That is part of our purpose at ShootDotEdit: to empower the professional wedding photographer to succeed, plus facilitate the photo editing and workflow process, so you can get back to the work you love. In some cases, that means providing detailed blog posts like this one, that address specific challenges you will commonly face in your photography career. But useful, relevant, photography content is not all we do.
We also offer a full suite of post-processing services that help you get your best wedding photos from raw image file to final print much more quickly. Contact us to find out how we can help support you and your wedding photography business with photo editing services online that save you time while maintaining your unique photography style.
Leave a comment