
How to Make a Collage in Lightroom
One way to creatively display your work and evoke the emotions of that special day is by creating a stunning collage in Lightroom. Here, we'll guide you through simple yet effective steps to design a captivating collage that showcases your talent and captures the essence of your couple's love story. From importing images to customizing the layout and exporting the final product, you'll soon be able to create a visual narrative that leaves a lasting impression on your clients and social media followers alike. So, keep reading to learn more about how to make a collage in Lightroom for your wedding clients and discover how to transform your wedding photos into a beautiful, cohesive masterpiece!
The Value of a Lightroom Collage

Collages, which group similar images in an attractive layout, tell more of the story of an event or group of people than one image could on its own. They have recently become popular in digital spaces with the rise of visual social media, as demonstrated by the number of online and mobile collage-creation websites and applications.
Collages in various formats have been a staple of the wedding and special occasion photography industry for many years. Learning how to make a collage in Lightroom that captures attention has value both for you and for your client.
1. VALUE FOR YOU, AS THE WEDDING PHOTOGRAPHER
As a wedding photographer, the ability to design an attractive collage demonstrates to potential clients you can do far more than just take photos on the day of the wedding. An eye-catching arrangement of 2 or more images from your shoot demonstrates an understanding of composition and balance that goes beyond the artistic design of a single image.
Through your collages, potential clients can see that you provide a consistent style and editing approach across a series of images. Finally, an expertly styled collage can serve as a great way to advertise your services and skills.
2. VALUE FOR YOUR CLIENTS
A collage of professional quality wedding images also has a unique value for your clients. The wedding collage you create provides them with an original way to remember a momentous occasion and gives more dimensions than a single image by itself. That collage could also serve as the basis for thank you cards and photo gifts the couple gives to their family and friends after the wedding.
Core Considerations for a Lightroom Collage

Understanding how to make a collage in Lightroom that is attractive and compelling goes beyond the technical aspects of creating the collage layout. In order for a wedding collage to be an effective design, which will attract new clients, it needs to follow certain key design principles. Some of these design concepts are balance, alignment, proximity, and theme.
1. BALANCE
Balance has to do with how elements of a design are arranged. In the case of a collage, it has to do with how the individual photos are arranged within the full space of the collage. A composition or collage that is well-balanced has harmony and will be more pleasing to viewers. Symmetrical balance is where elements are balanced on either side of the center, such as having photos of the same size on each side of the collage.
While this creates a nice collage, asymmetrical balance, where the focus is slightly off-center, either by visual elements of the photo or its size, makes for a more interesting collage.
2. ALIGNMENT
Another basic design principle that is particularly important in designing a collage is alignment which, naturally, refers to how the different elements of a design (the photos in your collage) line up with each other. Edge alignment describes the distance between each element and the outer edge of the design, while center alignment identifies a design with elements aligned to a horizontal or vertical center line. Either approach can be effective in creating a collage layout.
3. PROXIMITY

As a design principle, proximity is also essential to a quality collage design. Describing the distance that design elements have from each other, proximity is reflected in the distance between the photos of a collage in Lightroom. In its simplest terms, you want the width of the borders, or the empty space between the photos, to be consistent throughout the collage, whether it includes 3 images or 10.
4. THEME
Although the other key elements of an attractive Lightroom collage are more tangible and measurable, the theme is no less important in making the collage composition work visually. The concept of theme, also known as tone or style in a design, is that all the images in the design should have the same or similar style or treatment.
For example, a separate collage that includes only photos of a bride and groom in a distinct location will be better received than a collage that is a mix of subjects in both indoor and outdoor locations. Lighting, color balance, and similar elements also affect whether a collage has a cohesive theme.
These are just a few of the main principles of graphic design, all of which will apply to your design of photo collages in Lightroom as a wedding photographer. Perfecting these principles into a tangible design takes dedication and practice, which is why photographers often turn to collage templates to make the process easier. Using a predefined template by a trained designer makes it easier to achieve a stunning collage effect.
Make a Collage in Lightroom

There are several ways to create a collage in Lightroom, from designing a completely original collage layout to using a Lightroom collage template. We will cover both of these distinct approaches to using Lightroom to make a collage, starting with creating your own photo collage directly in Lightroom.
1. DESIGN YOUR OWN COLLAGE IN LIGHTROOM
Making your own original photo collage layout is more time-consuming than using a pre-created collage template, which can be a down-side for photographers who are already short on hours. However, a unique collage layout ensures each collage you create is distinct, and will not look quite like other collages your clients and potential customers have already seen.
A. IMPORT THE PHOTOS TO LIGHTROOM
If your images have not already been imported to Lightroom, you will need to add them to Lightroom before you begin creating your collage. Start the import process, enter the settings you wish to use, choose the files to be imported, and select the destination for the imported photos.
Suggested Read: How To Import Photos Into Lightroom & Create A Backup
B. EDIT THE PHOTOS IN LIGHTROOM
If you are importing new photos into Lightroom for the purpose of creating a collage, you will naturally want to have the editing process for each of the collage photos before you begin designing the collage. To make this stage of your workflow move more quickly, you can take advantage of the batch editing feature available in Lightroom. Another solution that will save you both time and effort is to use a photo editing service, like ShootDotEdit, to perfect your photos for you and then create your collage from those polished images.
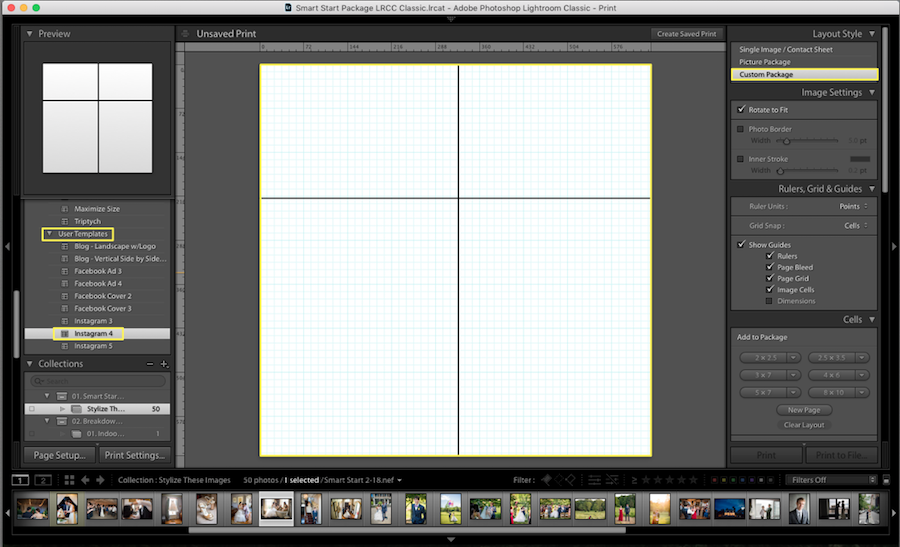
C. CREATE THE WORKSPACE FOR YOUR LIGHTROOM COLLAGE
Once you have your photos imported into Lightroom, you are ready to create the workspace for your collage. From the Print panel in Lightroom, locate the Print Job menu and set the overall dimensions for your collage.

This workspace should include enough space for the photos themselves, borders between them, and, should you choose, a border around the outside of all of the photos.
D. DESIGN THE PHOTO LAYOUT FOR YOUR LIGHTROOM COLLAGE
Next, you will want to create the individual spaces in the collage layout where your collage photos will live. You can add individual boxes in the size(s) of your choosing by using the “Add to Package” area in the Cells section of Lightroom’s Print menu.

You can use the predefined box sizes in this menu or edit the dimensions to a custom size to better suit your images. Play with the placement, sizing, and spacing of the collage layout until you are satisfied with it.
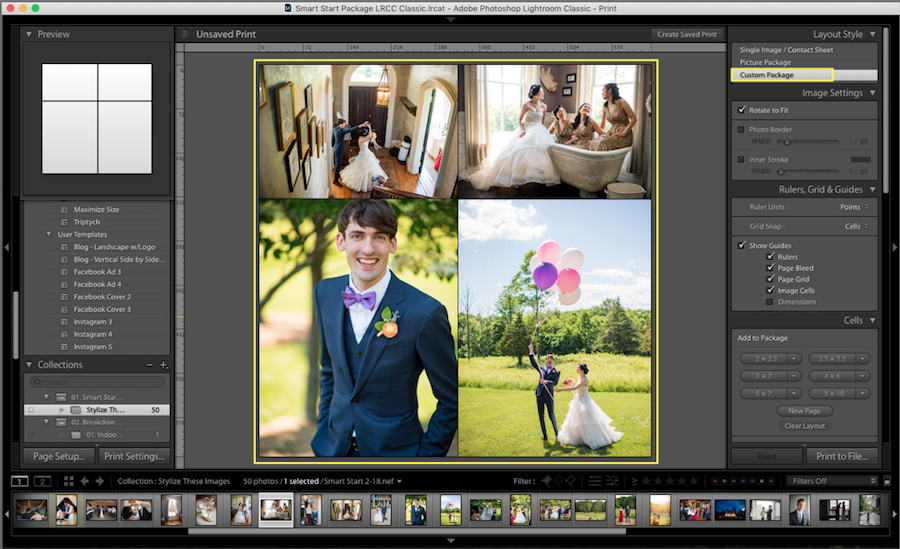
E. ADD THE PHOTOS TO THE LAYOUT YOU CREATED
Once your collage layout is set exactly how you want it to look, you can add your imported Lightroom images to the design. Lightroom makes this step easy as you can simply click on each photo and drag it to the box where you want the image to go. From there, you can rearrange the photos in your layout until the composition of the collage has the look you want and know your clients will love.

F. ADD EMBELLISHMENTS AND FINAL TOUCHES
If you are feeling particularly creative, you can expand on your collage design by adding text or design elements that complement the photos. In most cases, the best result is achieved by keeping these embellishments and final touches relatively simple, keeping the main focus on the wedding photos themselves, which are the most important aspect.
2. USE A LIGHTROOM COLLAGE TEMPLATE
Using a Lightroom collage template is one way you can expedite the process of creating beautiful wedding photography collages for each of your clients. There is less creativity involved in using these premade layouts since you are limited to the collage layout designs you are able to locate.
However, there are many resources and a wide variety of collage templates available online, including free Lightroom collage templates. Along with saving time, using layouts created by a professional designer ensures your collages follow the proper design principles discussed earlier.
A. IMPORT YOUR PHOTOS IN LIGHTROOM
Again, you will want to have the photos you intend to use imported into Lightroom and ready for release before you begin creating the collage. Consistent settings for importing and editing your photos are essential to a collage that has consistency and flow.
B. SELECT AND DOWNLOAD YOUR COLLAGE TEMPLATE
From paid options to free Lightroom collage templates, you have a wide variety of choices for premade collage templates that work well in Lightroom. Cole’s Classroom and Pretty Presets are just a few examples of sites with a library of professional Lightroom collage templates. After you download the file, you may need to unzip the file to extract the individual template files.

C. IMPORT THE TEMPLATE INTO LIGHTROOM
In the Print module in Lightroom, you will make a new folder under the “Template Browser” menu, giving a name to the new templates.

D. SELECT “IMPORT”
Then, navigate to your extracted template files from the previous step.

E. OPEN THE TEMPLATE IN LIGHTROOM AND ADD YOUR PHOTOS
Once you have imported the templates into Lightroom, you can add your photos to the template.
F. CREATE A COLLAGE READY FOR PRINTING
As with creating your own collage layout, you can create a wedding photo collage ready for printing or for sharing online in your portfolio or on social media.
Collages are a unique way to get even more out of your photography skills and individual photos by combining them in pleasing groups. Taking the time to learn how to make a collage in Lightroom demonstrates dedication to your craft and shows clients you care about more than just taking photos and delivering them.
Further Read: Top Reasons You Need To Outsource Photo Editing
As a wedding photographer, mastering the skill of creating collages in Lightroom is an invaluable skill that can elevate your work and offer clients a unique way to showcase their cherished memories. By taking the time to learn and perfect this technique, you can demonstrate your dedication to your craft and your ability to provide exceptional services that go beyond mere photo capturing. Efficient workflow, an eye for design, and an aesthetically pleasing collage layout are all key ingredients for achieving the best results. Learn more about how to maintain the organization of your images in Lightroom to help you with various projects, such as creating collages. As you continue to enhance your photography skills and expand your creative offerings using this technique, you can scale your work and customer experiences, resulting in a successful and thriving photography business.
At ShootDotEdit, we offer expert photo editing services tailored for professional wedding photographers. Additionally, we share valuable tips and strategies to help you grow and succeed in your photography business. To learn more about how we can help you grow your wedding photography business, check out our pricing plans.
Leave a comment