
You might wonder why a photo editing company like ShootDotEdit is offering you editing tips! Since we do the editing for you at the best price in the photo editing industry, it does seem unusual. But we know photographers - and we know that even when we offer the best editing services for wedding photographers, you still have to know how to edit your own photos to make those awesome final tweaks! And often you turn to Lightroom - an incredibly powerful program - to perfect and organize your best wedding photographs. However, the capabilities of Lightroom’s software make it more important (and more challenging) to know not just how to edit, but how to export photos from Lightroom the right way. Understanding the complexities of the export process within this program is essential when sharing images with current and potential customers as well as other vendors in print and various online formats. And in this blog, we break down the process for you!
HOW TO EXPORT PHOTOS FROM LIGHTROOM

It may not be as commonly known as Photoshop for image manipulation, but Lightroom has many additional features that make it a popular post-production tool. Lightroom has the same key post-processing capabilities that Photoshop provides. These capabilities include histogram, tone curve, color, split toning, detail, lens correction, effects, and camera calibration toolsets (all things an online photo editing service like ShootDotEdit can take care of for your images). Exporting photos from Lightroom is really easy… once you know how to do it.
Unlike Photoshop, Lightroom goes beyond the post-processing controls, doubling as a photo management tool. Its catalog-based workflow makes it easier to organize and conveniently store all of your photographs. Perhaps more importantly, edits in Lightroom are non-destructive, meaning your original images stay untouched and you can return to any step in the editing process. Throughout this post, we dive into the details of how to export photos from Lightroom and the best settings to use for print, web, and even Instagram.
Related Read: How To Organize Photos In Lightroom
WHY EXPORTING PHOTOS FROM LIGHTROOM IS COMPLICATED
There are several reasons why exporting finalized photos from Lightroom is a more elaborate process than other Adobe programs. To start with, your files are saved differently within Lightroom, so that you always have the original photos. The catalog information stored with Lightroom photos adds to the complexity of exporting them and, naturally, how you export your photos will depend on how those images will be used. These factors influence the best export settings for Lightroom in different situations.
1. LIGHTROOM SAVES IMAGES DIFFERENTLY

One of the biggest benefits of using Lightroom is that it takes a non-destructive approach to photo processing. While Photoshop’s design makes it all too easy to write over your original file with irreversible changes, in Lightroom, your original photo will never be adjusted. Instead, the changes you make are stored in the image file’s metadata fields and you can always start over with the original. Especially if you want to save different versions of the same photo, this makes the export process more complicated.
2. LIGHTROOM USES A UNIQUE CATALOGING SYSTEM
Lightroom maintains photos in a catalog system that lets you keep your photos anywhere you choose (even a separate computer from the one on which you use Lightroom) and it stores a preview of each image. While this storage system offers the flexibility of multiple catalogs and storing and backing up the same photograph in multiple catalogs, it does have repercussions for saving or exporting your photos. Most importantly, photo storage and even naming conventions should be determined before you do anything else.
3. LIGHTROOM EXPORTS SHOULD BE BASED ON INTENDED USE

Finally, how you export photos from Lightroom will be based on how those specific photos will be used. The appropriate or best Lightroom export settings for your wedding photographs will vary depending on whether they are being sent to a printer (and if you need to use the soft proofing feature in Lightroom), used for your online portfolio, or shared through Instagram. Knowing the right export settings will ensure that these images are perfectly designed for their ultimate destination and show your full talent as a wedding photographer.
THE PROCESS FOR EXPORTING PHOTOS FROM LIGHTROOM
The steps in the process of exporting Lightroom photos is a surprisingly short list and makes it seem deceptively simple. After selecting the files for export and choosing the export destination, you will either need to choose an export preset or specify unique export settings. These final stages of the export process require a solid understanding of a wide range of settings and file information.
1. SELECT THE FILES FOR EXPORT
The first step is to choose the photo or photos that you want to export with the same settings. This is done the same way you would select sets of photos for labeling or metadata management in Lightroom, by selecting them from Lightroom’s grid view or the Filmstrip. This way, you can export multiple images that are intended to be used in the same way, without going through a separate export process for each photo.
2. OPEN THE EXPORT DIALOG BOX TO CHOOSE THE EXPORT DESTINATION
 Images by ShootDotEdit Customer @brandiallysephoto
After choosing the files that are ready for export in Lightroom, you will use the program’s Export dialog box to enter the appropriate export settings. This dialog box will allow you to manage a wide range of parameters for saving photos from Lightroom, starting with the destination of the photos.
Along with selecting the folder where the exported images will be stored on your hard drive, flash drive, or disc, you can also choose to add the selected photos to a Lightroom catalog (which is what ShootDotEdit customers do to receive personalized editing on their images). From there, you will need to choose an export preset or select the right export settings for the images.
3. EXPORT PHOTOS USING LIGHTROOM EXPORT PRESETS
One option for choosing export settings is to use the presets that already exist within Lightroom. These built-in presets include Burn Full-Sized JPEGs, Export to PNG, For Email, and For Email (hard drive).
Although using Lightroom’s export presets may seem convenient, these 4 options are very limited. The basic functionality of these built-in export options can also mean not getting the best results for your final images.
4. SPECIFY THE EXPORT OPTIONS
To ensure each of your images is optimized for its intended use, the best method is to specify the individual export options yourself, rather than relying on built-in presets. This gives you more control over the export process and allows you to choose the specific settings that are right for each format.
Beyond the export location, Lightroom’s Export dialog box allows you to select both image and storage-related settings for your exported photography. File naming is just the start of the export options, followed by the file settings. Depending on the format you choose, you will then be able to choose export settings for quality, color space, compression, and compatibility.
The Export dialog box also includes settings for image sizing, which can be based on specific dimensions, maximum width or height, or a specified resolution. From the dialog, you can apply output sharpening to exported images based on the intended photo media and resolution, as well as determine how metadata will be stored with the images. The final options in this Export dialog box allow you add a watermark or open the exported photos in another program, such as Photoshop, where you could make further adjustments by whitening teeth for your clients or other guests in the photos or blurring the background of your photos.
5. STORE YOUR EXPORT SETTINGS AND EXPORT YOUR IMAGES
If you have created a group of export settings that you want to use in the future, Lightroom will allow you to save those settings as a new preset.
Naming your presets clearly will be key to identifying the correct preset to use in the future. These more fine-tuned presets can save significant time in exporting your photos, but only if those settings are truly optimized for your needs. Once all of your settings are correct, you are ready to export your photos.
Related Read: How To Use Lightroom Presets
BEST LIGHTROOM EXPORT SETTINGS
As mentioned above, different use cases for your photos will require different export settings to have the greatest impact. If you know how to export photos from Lightroom in the best way for each platform, your clients will be even more pleased with their results. In addition, your perfect photos will draw more potential clients from your online and physical portfolios.
The following are the best export settings for Lightroom based on some of the most common destinations and uses you will have for your photography. This only represents the basics, as learning to fine-tune these settings for the optimal effect will take time and practice.
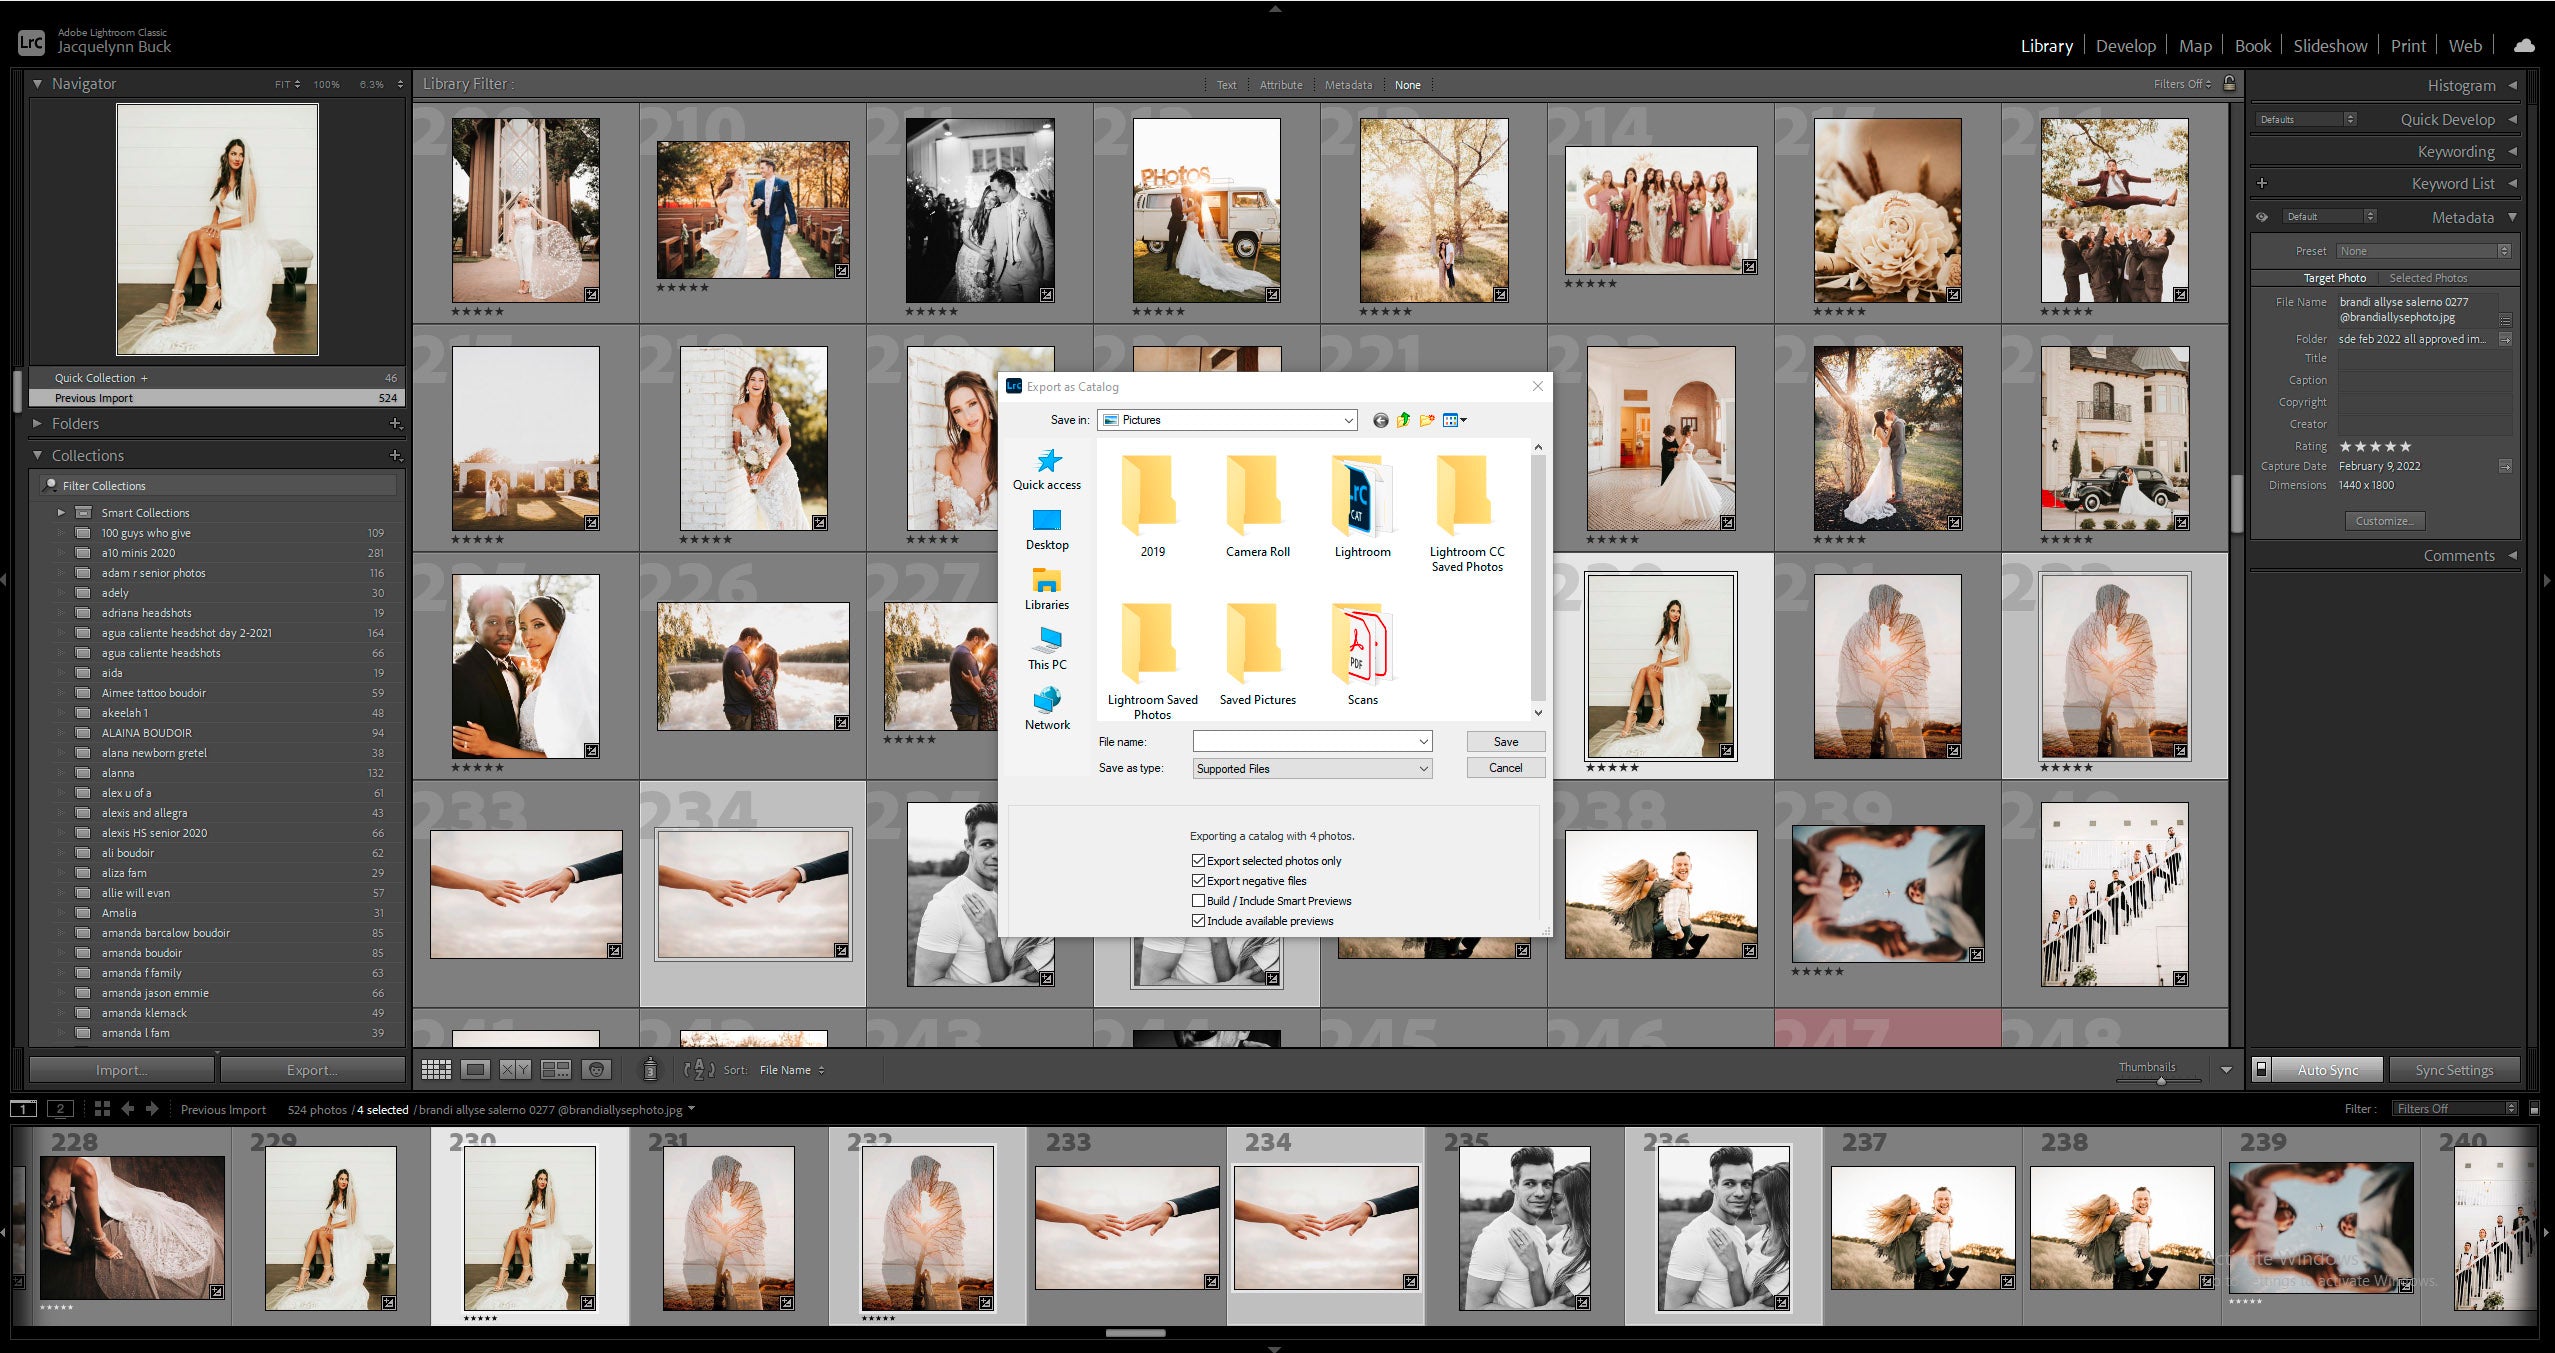
1. LIGHTROOM EXPORT AS CATALOG
 Images by ShootDotEdit Customer @brandiallysephoto
When you want to export a group of photos from a larger Lightroom catalog, you will use Lightroom’s Export As Catalog option. Out of all of the export types, exporting as a catalog is likely the simplest. Exporting will create a new catalog that links those photos and their connected metadata. For example, when a ShootDotEdit customer is ready to send their images to receive professional photo editing services, they follow these steps:
- Select the photos for the new catalog; then choose the name and location for the catalog.
- Decide whether or not negative files (the original image files) and previews will be exported along with the images.
2. BEST LIGHTROOM EXPORT SETTINGS FOR PRINT
The print sizes for wedding photography can vary, from wallet-sized images to large-scale, gallery-ready prints. Because these photos can be printed in very large formats, one of the largest export concerns is ensuring that they maintain the highest possible quality. As a result, having the best Lightroom export settings for print requires knowing how to export high-resolution images from Lightroom.
The following are the key Lightroom export settings for high-resolution images that will make beautiful prints:
- Under File Settings, set the Image Format to JPEG and put the Quality Slider at 100 to maintain the highest quality. The Color Space Lightroom export setting for print should be sRGB, and “Limit File Size” should not be checked.
- Under Image Sizing, again “Resize to Fit Box” should be left unchecked to maintain full size. The Resolution Lightroom export setting for high-resolution results should be 300 pixels per inch, and Output Sharpening will be based on the intended print format and the printer being used. For the basic settings, you can start with the “Matte Paper” selection and a low amount of sharpening.
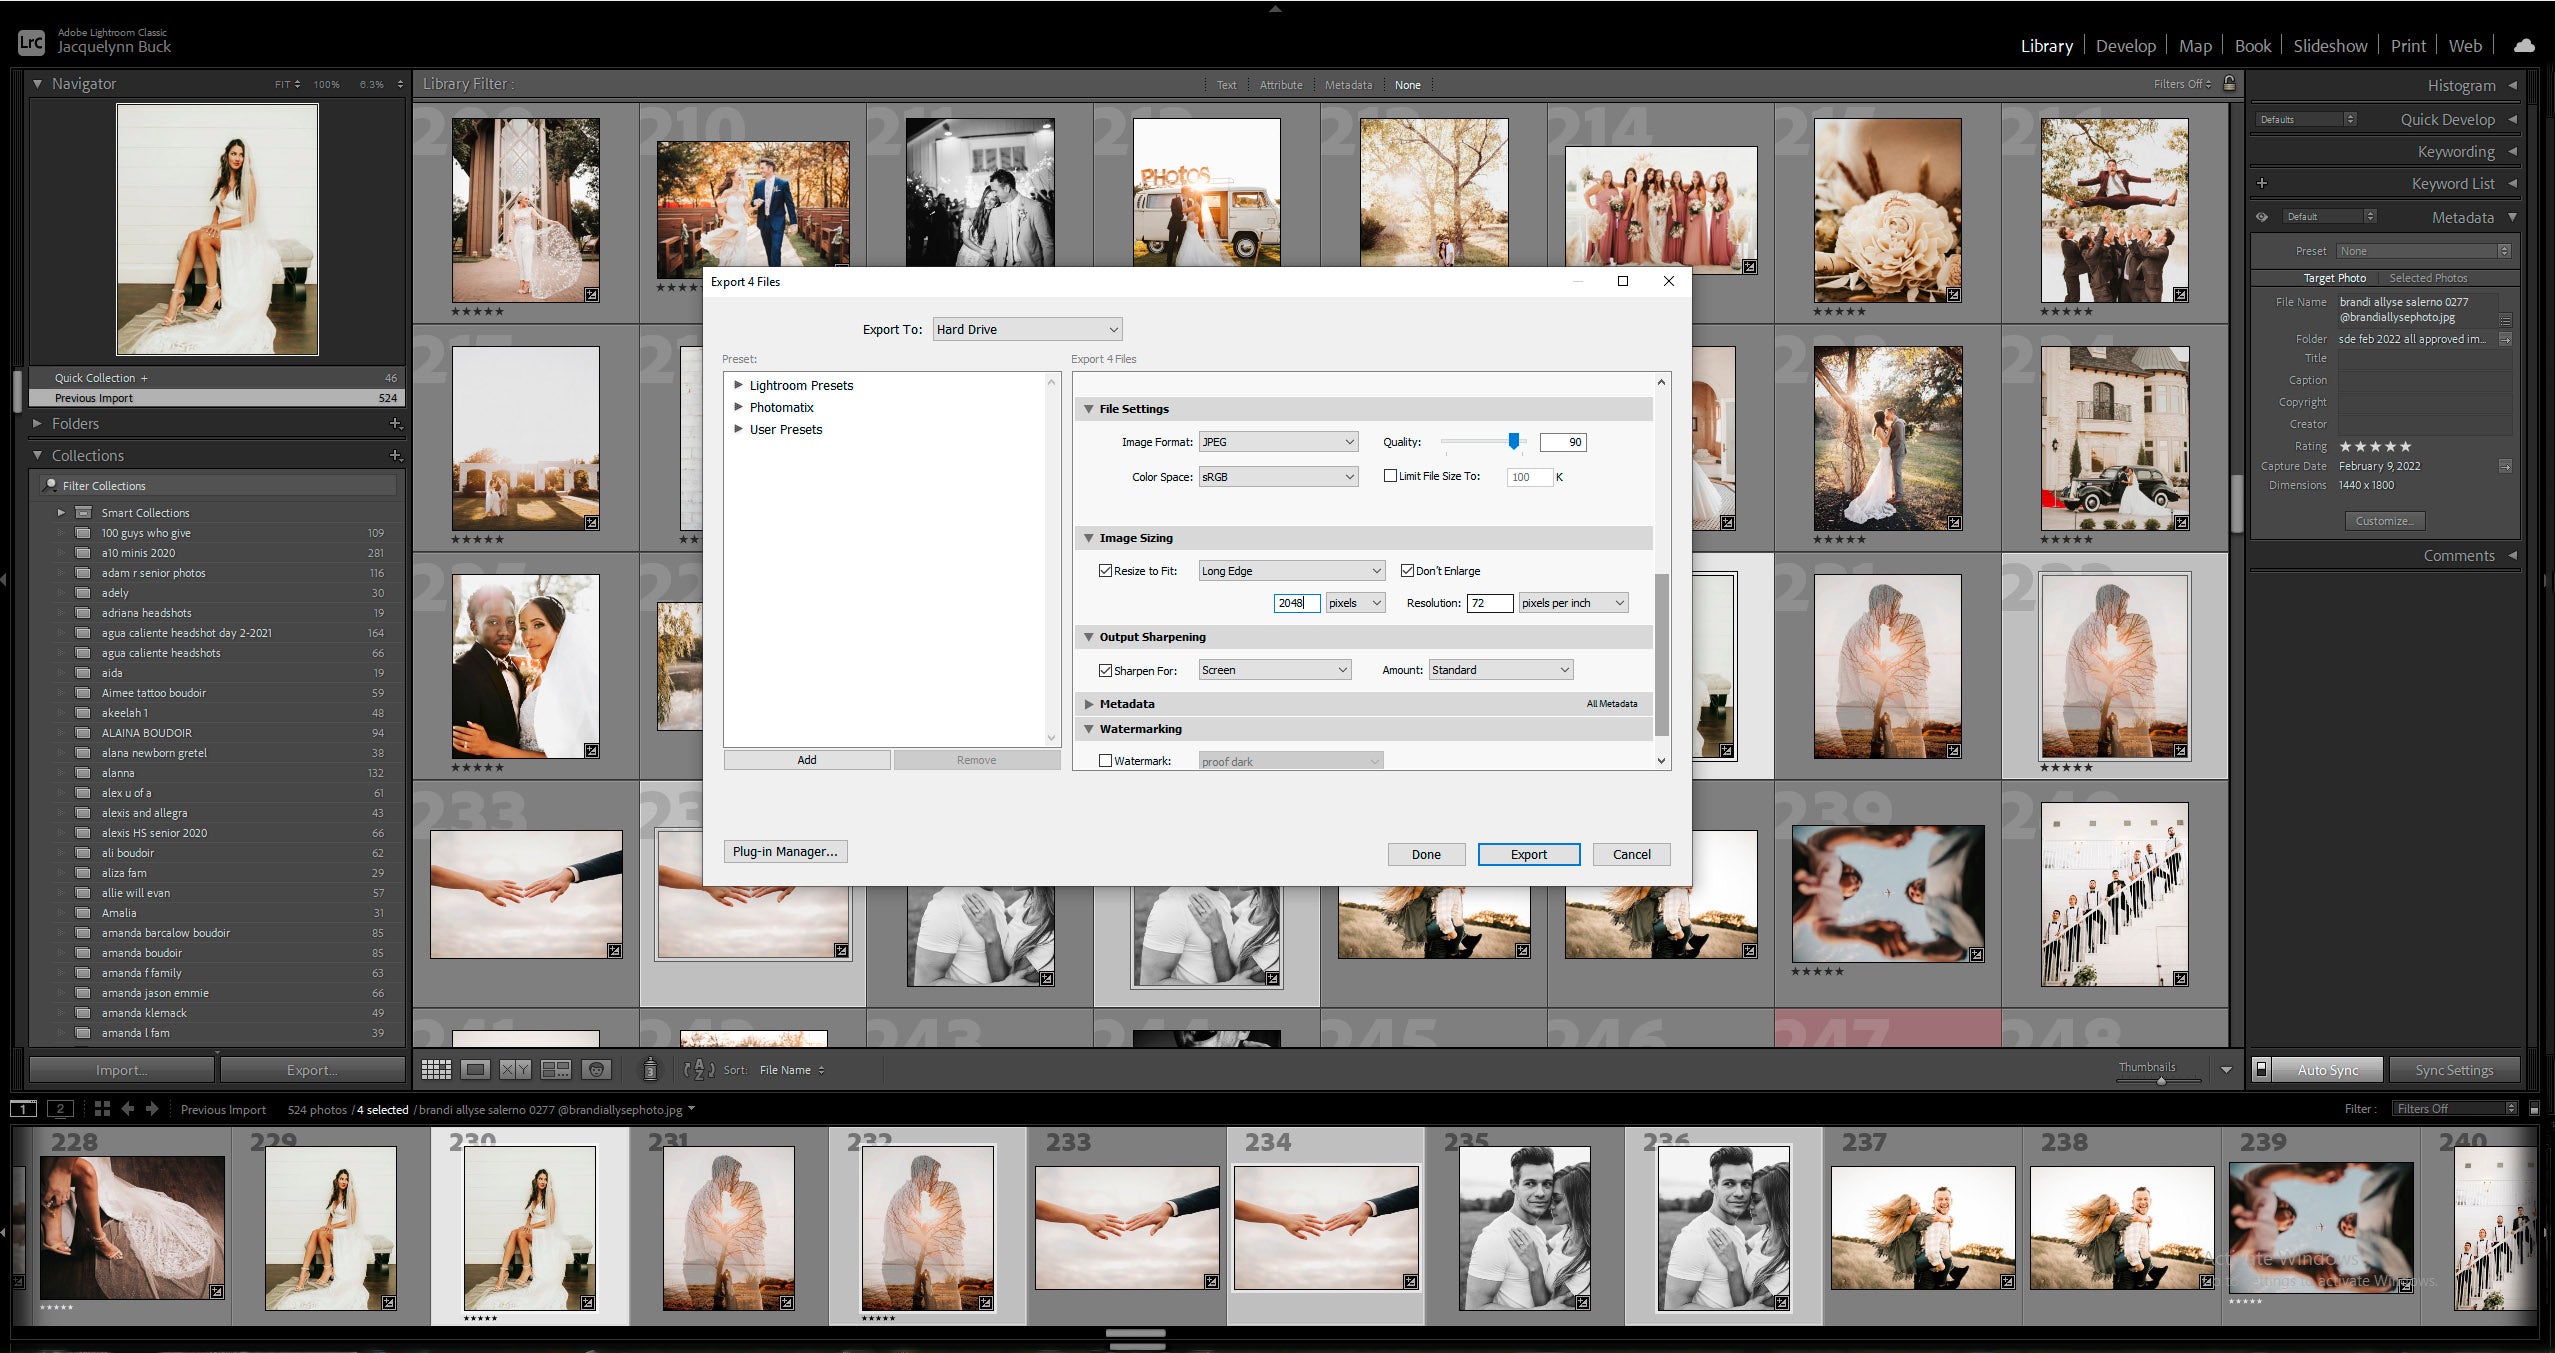
3. BEST LIGHTROOM EXPORT SETTINGS FOR WEB
As with printing your wedding photography, there are many online uses for your images, and you will want to ensure you have the best Lightroom export settings for the web. This varies for each photographer, but smaller file size becomes more important than having an extremely high resolution when it comes to exporting photos from Lightroom to display on the web.
The following are Lightroom export settings for high-resolution images, specifically for the web. The Image Sizing settings are where these export types really differ:
- Under File Settings, set the Image Format to JPEG and put the Quality Slider to be set from around 77-100. The Color Space Lightroom export setting for the web should be sRGB, and “Limit File Size” can be used if needed to meet specific requirements.
- Under Image Sizing, check the “Resize to Fit Box” and use the drop-down menu to put in the size that you need, for example, a specific width for your blog. Setting the long edge at 2048 pixels is recommended for general web use, but you can also put in specific dimensions as needed for your website or social media sites.
- Also under Image Sizing, set the Resolution to 72 pixels per inch, the standard resolution for the web. For the best results, Output Sharpening for online use images should be done in Lightroom’s detail section prior to exporting.
4. BEST LIGHTROOM EXPORT SETTINGS FOR INSTAGRAM
 Images by ShootDotEdit Customer @brandiallysephoto
The export settings for web also represent the best Lightroom export settings for Instagram. A few important points to keep in mind, as a review:
- Set the long edge for 2048 pixels
- Keep the initial image quality at 100
- Set Resolution to 72 pixels per inch
Focus on getting the file size as low as possible. By balancing high-quality images with a smaller file size, these export settings display your best work in a share-friendly format. These Lightroom export settings for Instagram can also be an effective option for sharing preview images with clients through email, where large file sizes can be an issue.
5. BEST LIGHTROOM EXPORT SETTINGS FOR OTHER SOCIAL MEDIA
For the quality setting, platforms like Facebook automatically reduce image resolution, so keeping the initial image quality at 100 may have the best results. These setting details for both print and web are just the beginning when it comes to exporting photos from Lightroom. As with any creative endeavor, it will take time and testing to find the ideal export settings that work for your photos, your customers, and your unique photography style (and it will vary some with each photo).
Knowing how to export photos from Lightroom is only one aspect of the multi-functional program. How else can you use Lightroom in your post-wedding workflow to save time and be as efficient as possible? Click here for more photo editing tips!
Further Read: Top 5 Advanced Lightroom Tips
And when you finally feel like you’re ready to stop doing your own wedding photo editing, we at ShootDotEdit are ready to share the load and match your style with our professional photo editing services. To learn more about how we can help lessen your post-production workload, check out our pricing plans.
Leave a comment